
Do you want to have both mobile and web apps in the same repo? Do you wish that you could share code between mobile and web apps? This blog post shows you how to create a React Native mobile app and a React web app in the same repo with shared libraries using Nx.
It goes through how to create a simple 2-page app that shows your daily horoscope based on your zodiac sign.
 Screenshots of Daily Horoscope App
TL;DR — GitHub repo: xiongemi/aztro-daily-horoscope
Overview
Tech Stack
- Mobile Frontend: React Native
- Web Frontend: React
- UI Library: React Native Elements
- State Management: Redux
- Navigation: React Navigation
- API: aztro
Setup
For iOS and Android development environment setup, please see https://reactnative.dev/docs/environment-setup.
To create an Nx workspace, run:
❯
npx create-nx-workspace aztro-daily-horoscope --preset=react-native
To generation the application daily-horoscope-app, run:
❯
nx generate application **daily-horoscope-app**
This should generate daily-horoscope-app folder under apps:
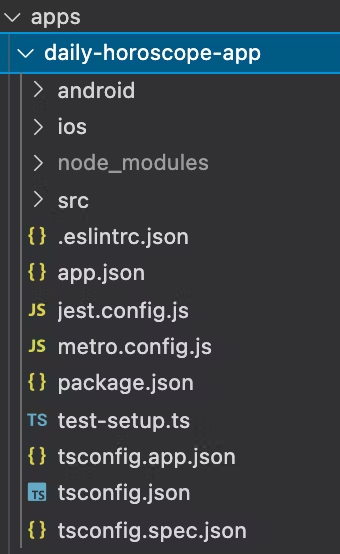 daily-horoscope-app folder
Now you install the starter project of Nx React Native. If you run:
nx run-ios daily-horoscope-app, it should launch the app in the iOS simulator.nx run-android daily-horoscope-app, it should launch the app in the Android simulator.
Install React Native Elements
This example uses React Native Elements as its UI component library and react-native-vector-icons as its icon library.
To install, run:
❯
# npm
❯
npm install --save @rneui/base @rneui/themed react-native-vector-icons react-native-safe-area-context
❯
# yarn
❯
_**yarn add @rneui/base @rneui/themed react-native-vector-icons react-native-safe-area-context
In the app’s package.json at apps/daily-horoscope-app/package.json, under dependencies, add the above packages:
1{
2  name: 'daily-horoscope-app',
3  version: '0.0.1',
4  private: true,
5  dependencies: {
6    // other dependencies
7    '@rneui/base': '*',
8    'react-native-gesture-handler': '*',
9    'react-native-reanimated': '*',
10    'react-native-safe-area-context': '*',
11    'react-native-screens': '*',
12  },
13}
14
Install react-native-vector-icons for iOS
There are additional steps needed to add the icon font files to the iOS and Android bundle.
In apps/daily-horoscope-app/ios/Podfile file, add below line before post_install:
1pod 'RNVectorIcons', :path => '../../../node\_modules/react-native-vector-icons'
2
In apps/daily-horoscope-app/ios/DailyHoroscope/Info.plist file, add below key array pair before the closing </dict> tag:
1 <key>UIAppFonts</key>
2 <array>
3  <string>AntDesign.ttf</string>
4  <string>Entypo.ttf</string>
5  <string>EvilIcons.ttf</string>
6  <string>Feather.ttf</string>
7  <string>FontAwesome.ttf</string>
8  <string>FontAwesome5\_Brands.ttf</string>
9  <string>FontAwesome5\_Regular.ttf</string>
10  <string>FontAwesome5\_Solid.ttf</string>
11  <string>Foundation.ttf</string>
12  <string>Ionicons.ttf</string>
13  <string>MaterialIcons.ttf</string>
14  <string>MaterialCommunityIcons.ttf</string>
15  <string>SimpleLineIcons.ttf</string>
16  <string>Octicons.ttf</string>
17  <string>Zocial.ttf</string>
18  <string>Fontisto.ttf</string>
19 </array>
20
Go to the iOS folder at apps/daily-horoscope-app/ios and run Pod install. After running the command, you should see there are some changes in Podfile.lock file.
Install react-native-vector-icons for Android
In file apps/daily-horoscope-app/android/app/build.gradle, add below line at end of the file:
1apply from: "../../../../node\_modules/react-native-vector-icons/fonts.gradle"
2
Great! You have installed the UI component library and icon library.
Create a Page in React Native
Now, you need to create the first page of your app: a page that shows a list of all the zodiac signs and allows users to choose from it.
Create Models
First, create a library for the models:
1nx generate lib models
2
This should generate a models folder under libs:
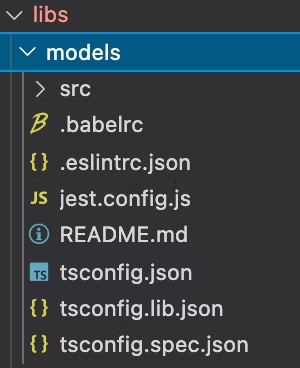 models folder under libs
Then under this models folder, create a file to have the below enum that contains all the zodiac signs:
1export enum AdhZodiacSign {
2  Aries = 'Aries',
3  Taurus = 'Taurus',
4  Gemini = 'Gemini',
5  Cancer = 'Cancer',
6  Leo = 'Leo',
7  Virgo = 'Virgo',
8  Libra = 'Libra',
9  Scorpio = 'Scorpio',
10  Sagittarius = 'Sagittarius',
11  Capricorn = 'Capricorn',
12  Aquarius = 'Aquarius',
13  Pisces = 'Pisces',
14}
15Note: the enum has a prefix “Adh” to indicate it is a model under domain “aztro-daily-horoscope”. Add this prefix to distinguish model names from component names.
This example uses icons from Material Community Icons. You need to create a list that contains the zodiac sign name and its matching icon.
1import { AdhZodiacSign } from './zodiac-sign.enum';
2
3export interface AdhZodiacSignItem {
4  icon: string;
5  zodiacSign: AdhZodiacSign;
6}
71import { AdhZodiacSignItem } from './zodiac-sign-item.interface';
2import { AdhZodiacSign } from './zodiac-sign.enum';
3
4export const AdhZodiacSignList: AdhZodiacSignItem[] = [
5 {
6 zodiacSign: AdhZodiacSign.Aries,
7 icon: 'zodiac-aries',
8 },
9 {
10 zodiacSign: AdhZodiacSign.Taurus,
11 icon: 'zodiac-taurus',
12 },
13 {
14 zodiacSign: AdhZodiacSign.Gemini,
15 icon: 'zodiac-gemini',
16 },
17 {
18 zodiacSign: AdhZodiacSign.Cancer,
19 icon: 'zodiac-cancer',
20 },
21 {
22 zodiacSign: AdhZodiacSign.Leo,
23 icon: 'zodiac-leo',
24 },
25 {
26 zodiacSign: AdhZodiacSign.Virgo,
27 icon: 'zodiac-virgo',
28 },
29 {
30 zodiacSign: AdhZodiacSign.Libra,
31 icon: 'zodiac-libra',
32 },
33 {
34 zodiacSign: AdhZodiacSign.Scorpio,
35 icon: 'zodiac-scorpio',
36 },
37 {
38 zodiacSign: AdhZodiacSign.Sagittarius,
39 icon: 'zodiac-sagittarius',
40 },
41 {
42 zodiacSign: AdhZodiacSign.Capricorn,
43 icon: 'zodiac-capricorn',
44 },
45 {
46 zodiacSign: AdhZodiacSign.Aquarius,
47 icon: 'zodiac-aquarius',
48 },
49 {
50 zodiacSign: AdhZodiacSign.Pisces,
51 icon: 'zodiac-pisces',
52 },
53];
54Create a Component for Zodiac Sign List
Then, create a library for the UI and create a component zodiac-sign-list:
❯
nx generate lib ui
❯
nx generate component zodiac-sign-list --project=ui --export
This generates the folder zodiac-sign-list under ui/src/lib.
In the libs/ui/src/lib/zodiac-sign-list/zodiac-sign-list.tsx file, add the below code. It uses the FlatList component from react-native and the ListItem component from React Native Elements. It is going to passAdhZodiacSignList from themodels library you created above to the FlatList component.
1import {
2  AdhZodiacSignItem,
3  AdhZodiacSignList,
4} from '@aztro-daily-horoscope/models';
5import React from 'react';
6import { FlatList } from 'react-native';
7import { ListItem } from '@rneui/base';
8import Icon from 'react-native-vector-icons/MaterialCommunityIcons';
9
10export function ZodiacSignList() {
11  const keyExtractor = (item: AdhZodiacSignItem) => item.zodiacSign;
12
13  return (
14    <FlatList
15      keyExtractor={keyExtractor}
16      data={AdhZodiacSignList}
17      renderItem={({ item }) => (
18        <ListItem bottomDivider>
19          <Icon name={item.icon} />
20          <ListItem.Content>
21            <ListItem.Title>{item.zodiacSign}</ListItem.Title>
22          </ListItem.Content>
23          <ListItem.Chevron />
24        </ListItem>
25      )}
26    />
27  );
28}
29
In the apps/daily-horoscope-app/src/app/App.tsx file, you could now use the above zodiac-sign-list component:
1import * as React from 'react';
2import { ZodiacSignList } from '@aztro-daily-horoscope/ui';
3import { Header } from '@rneui/base';
4
5const App = () => {
6 return (
7 <>
8 <Header centerComponent={{ text: 'Daily Horoscope' }} />
9 <ZodiacSignList />
10 </>
11 );
12};
13
14export default App;
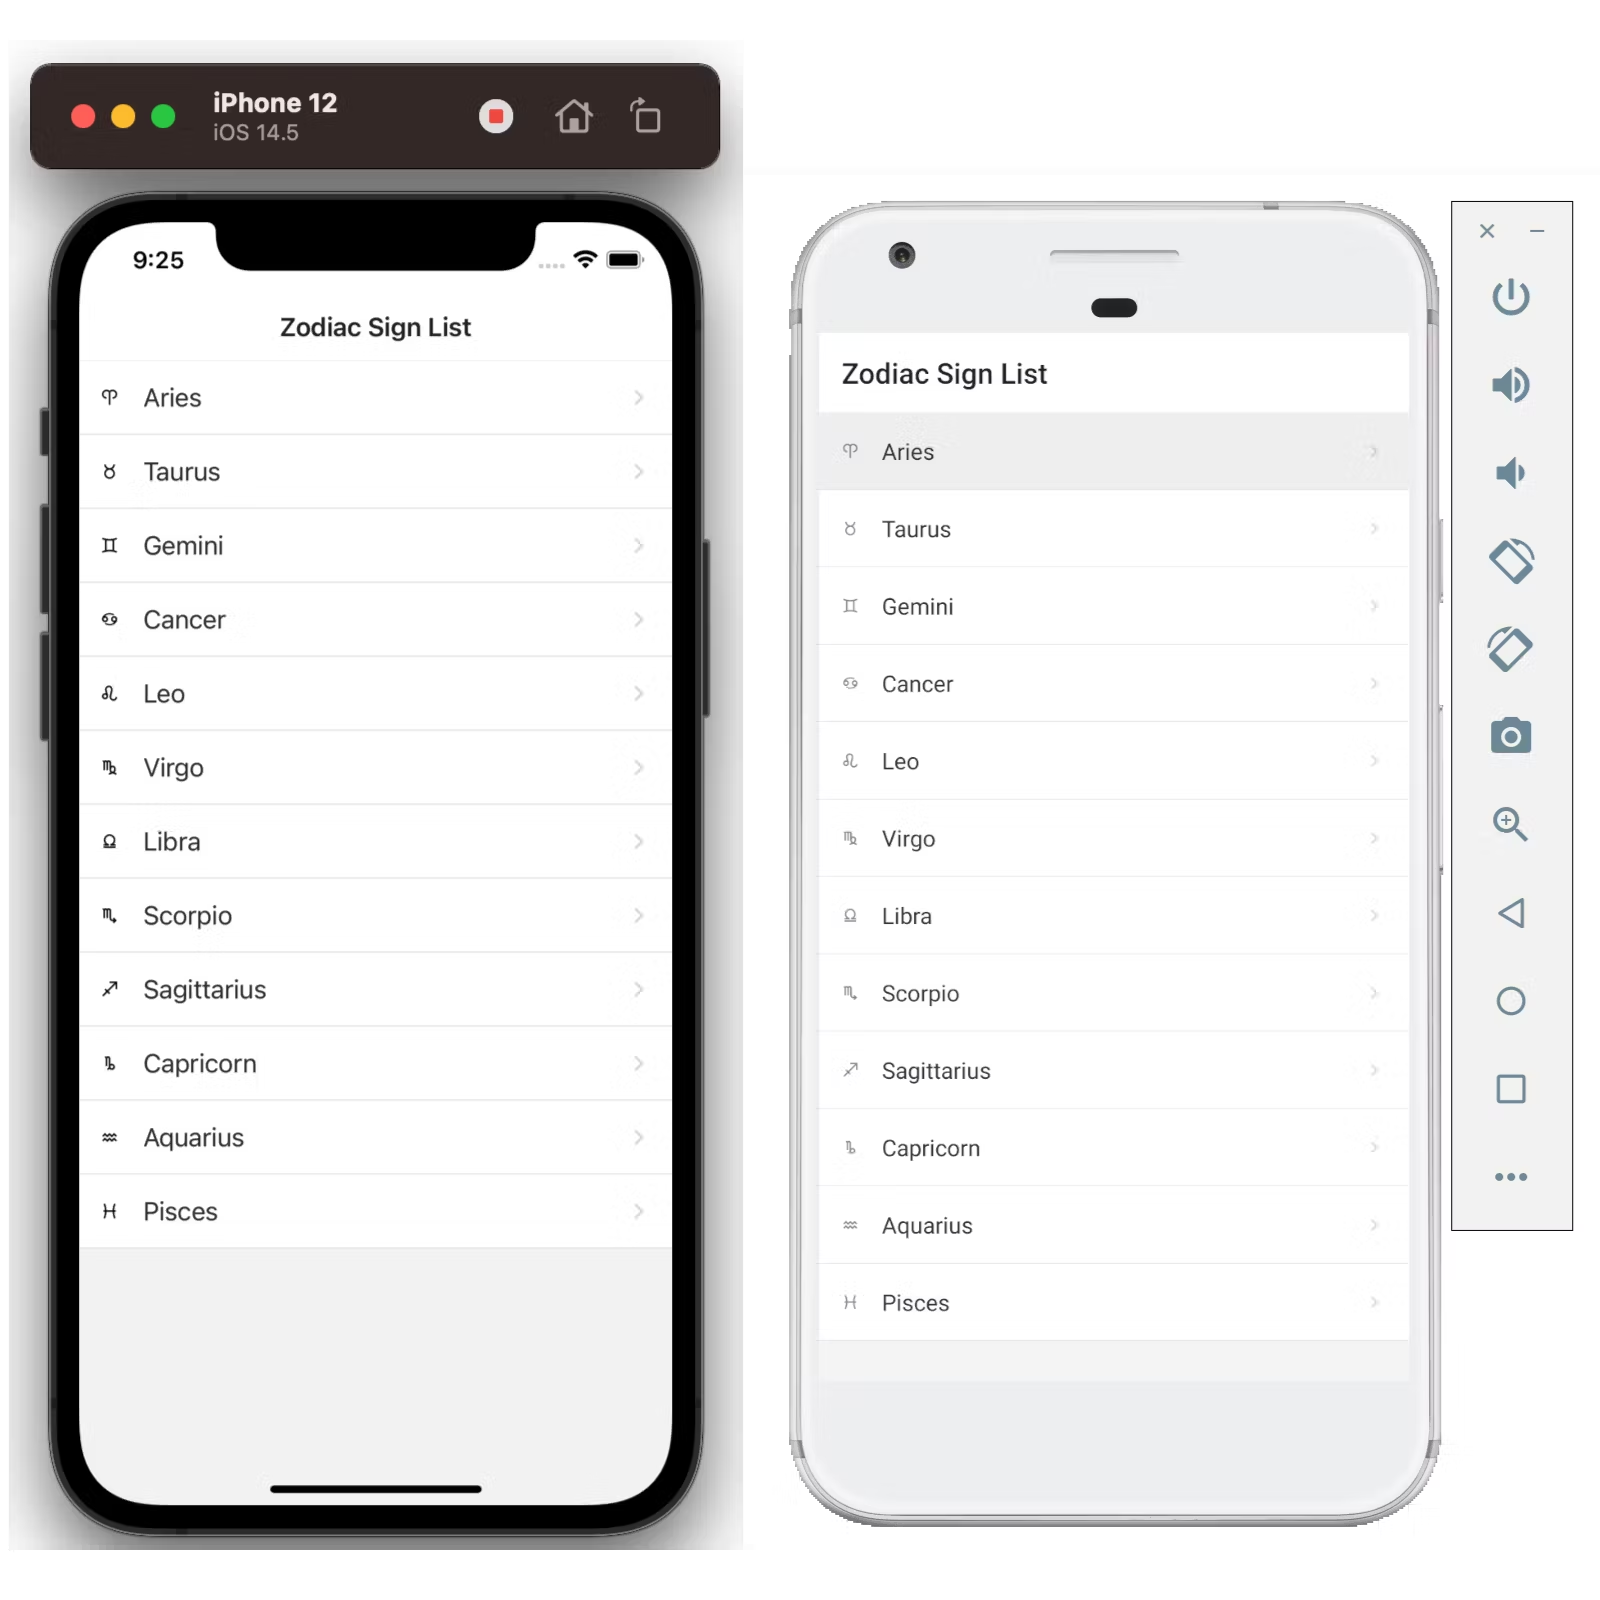
15If you run nx run-ios daily-horoscope-app and nx run-android daily-horoscope-app, you should see something like:
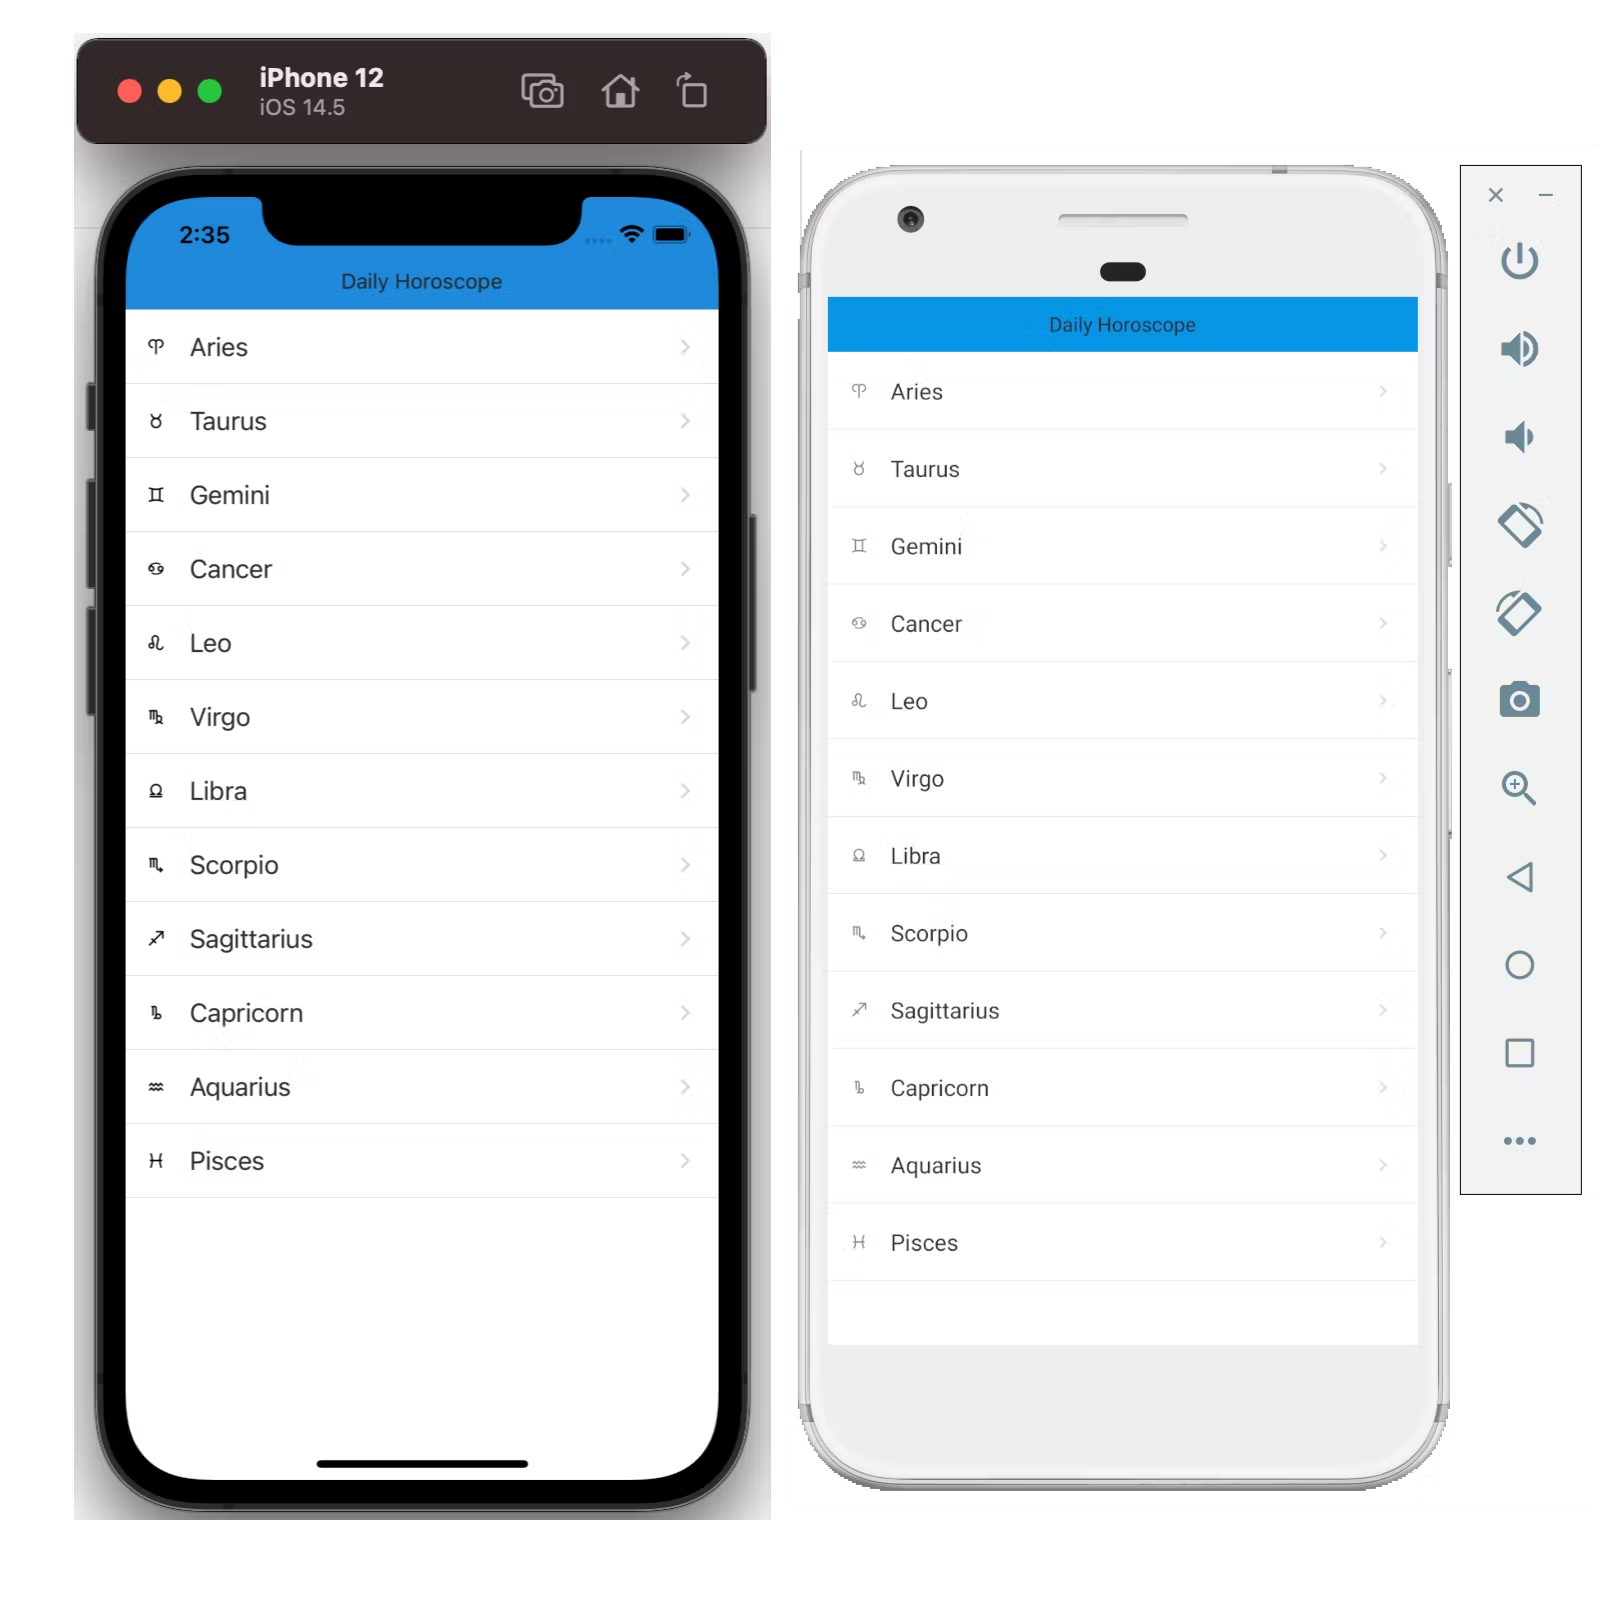 Left: iOS simulator, right: Android simulator
You have created the first page of your app.
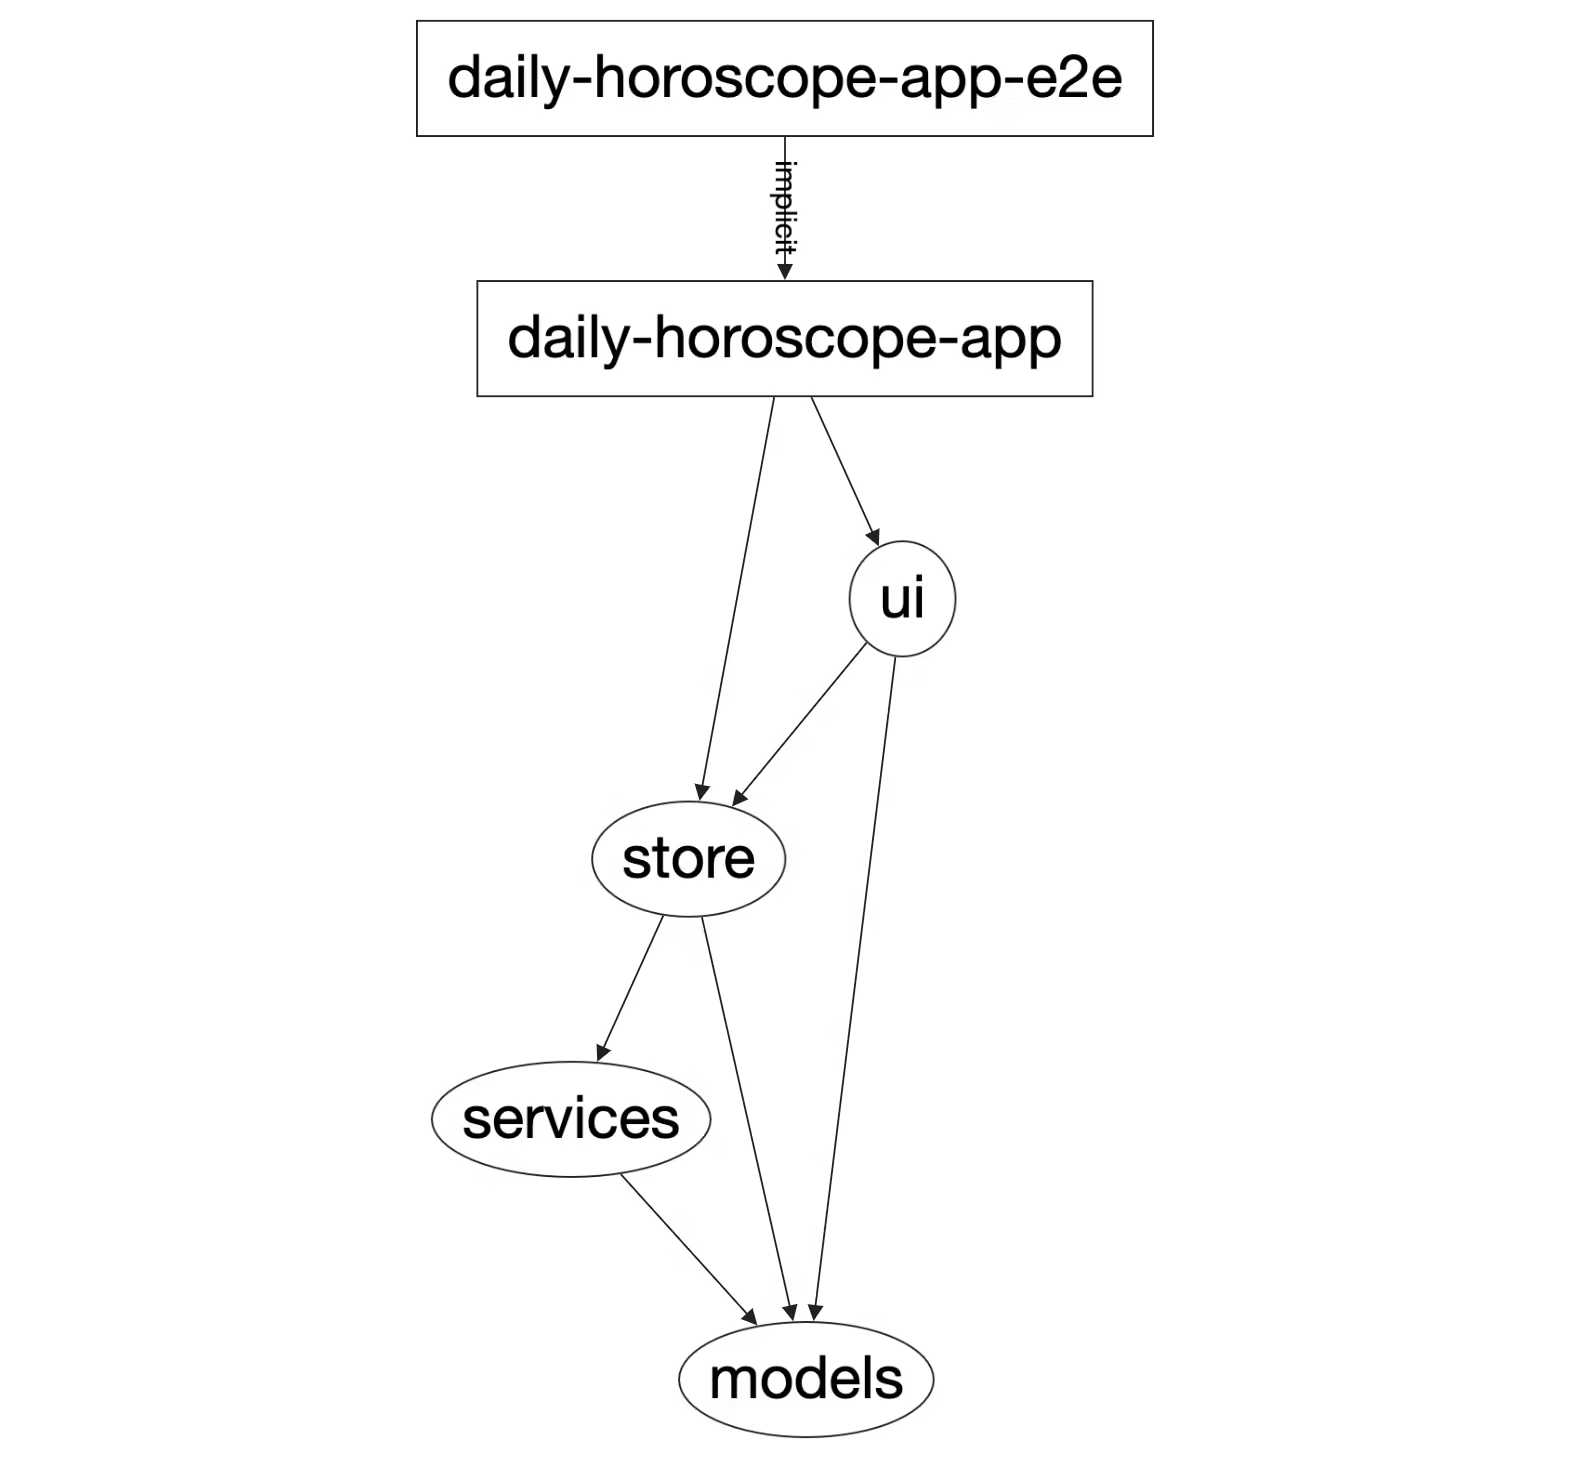
If you run the command nx dep-graph, you should see what the dependency graph looks like below:
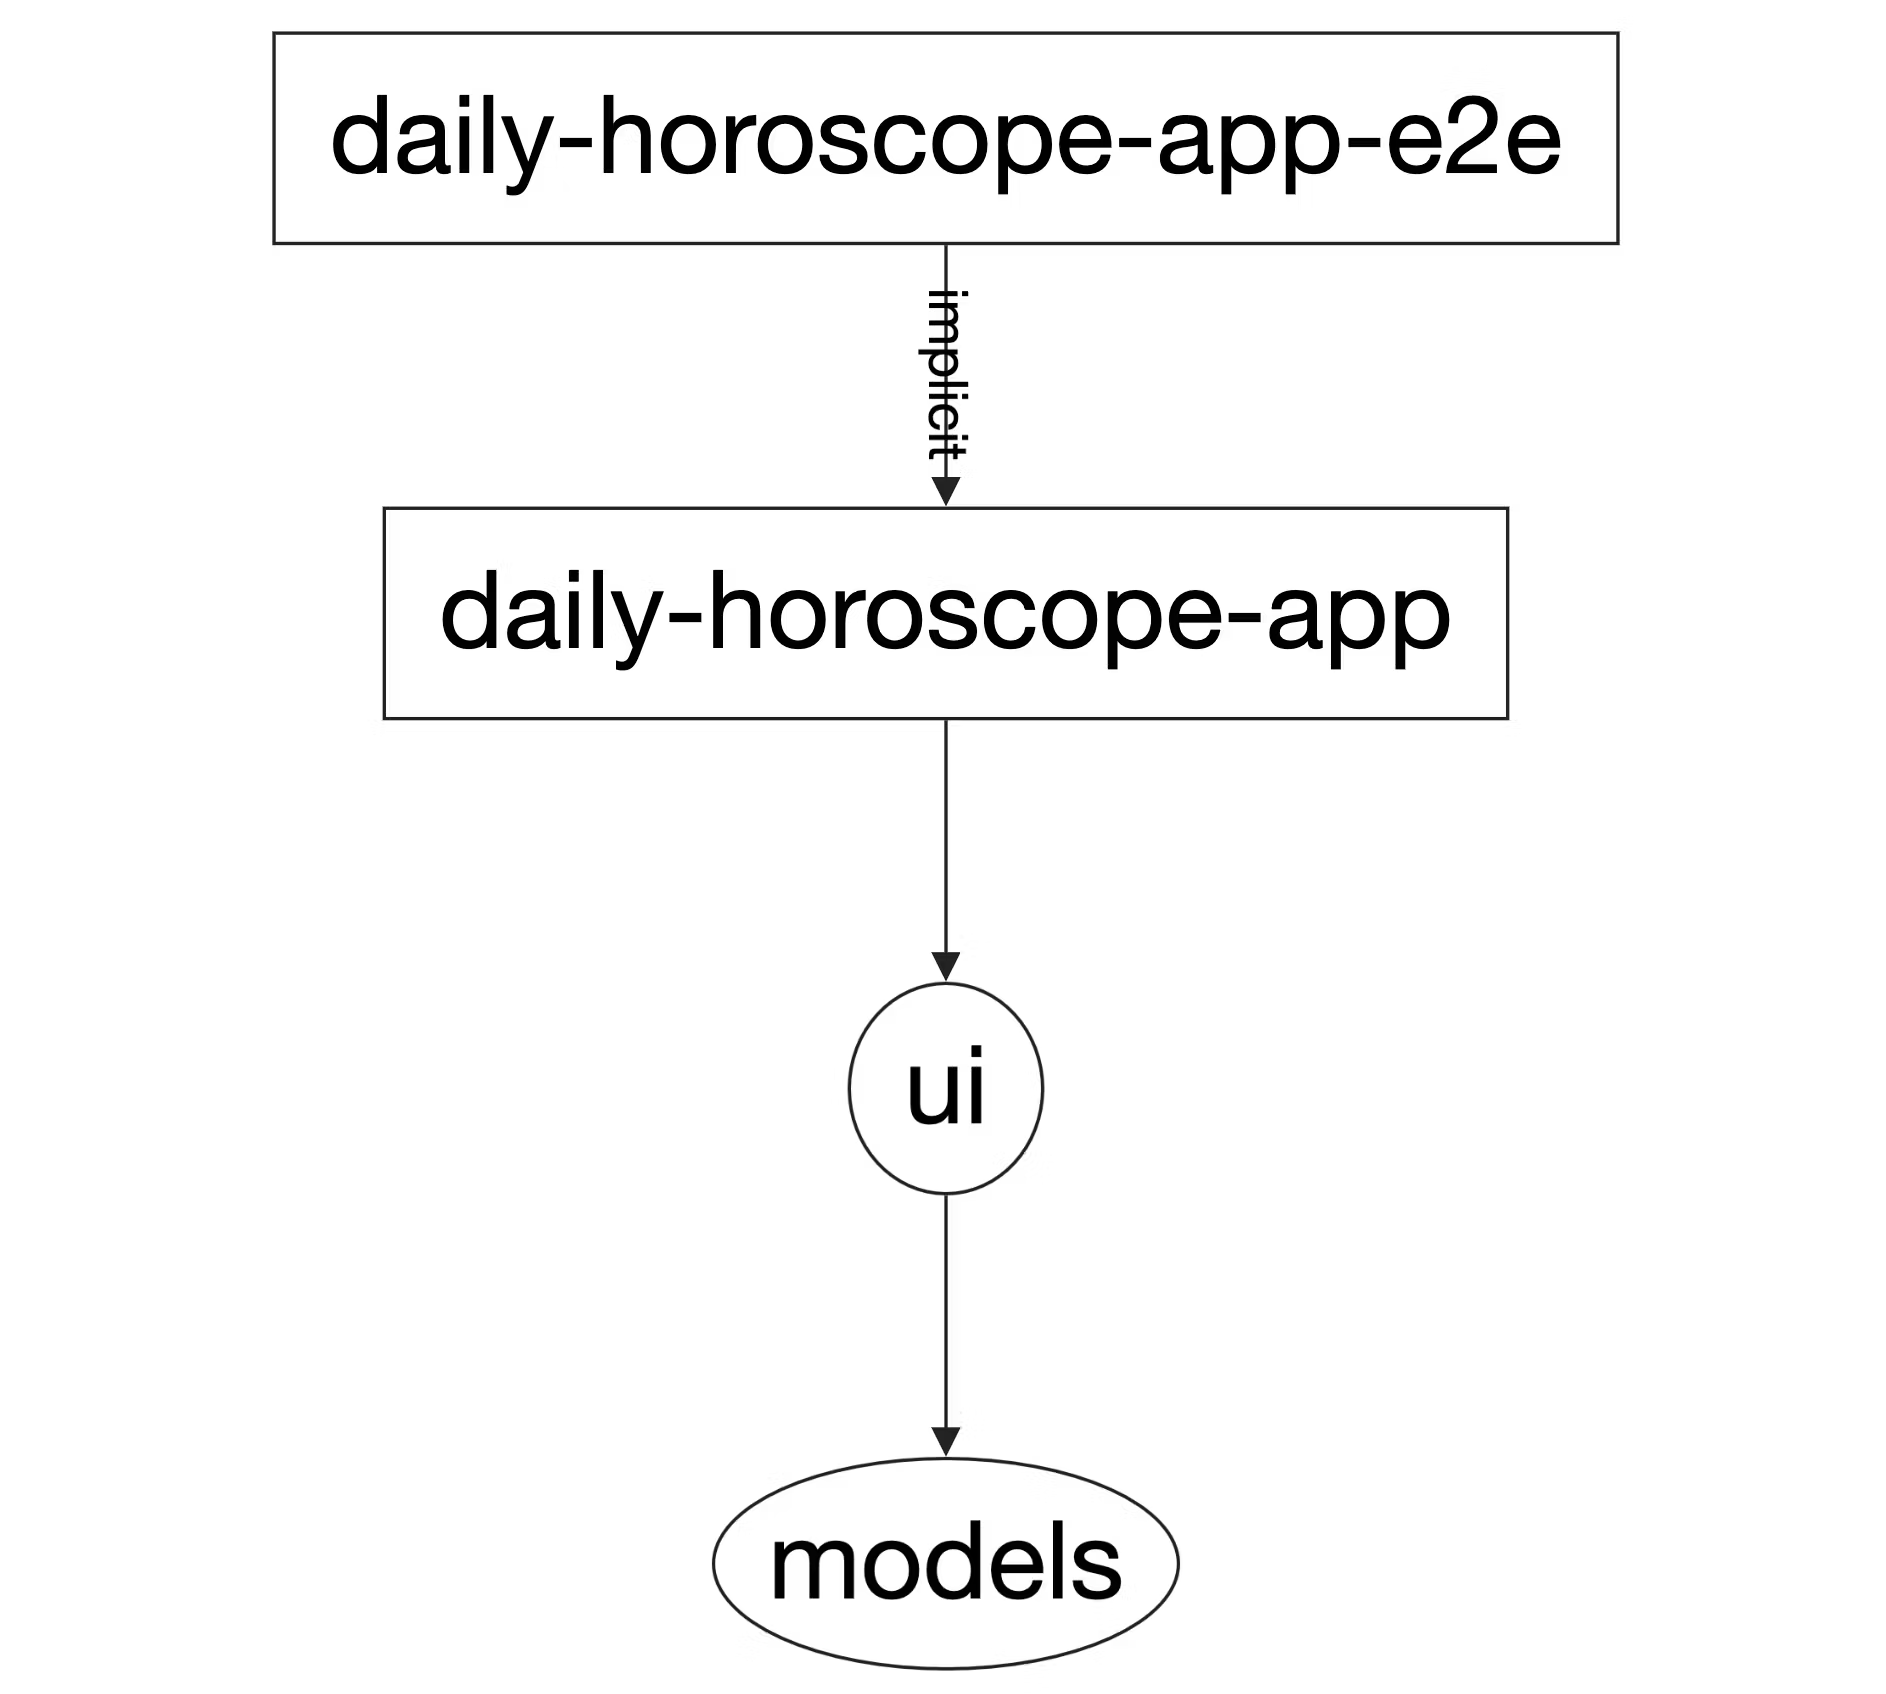 Dependency graph
The next step is to handle action when users pressed on a list item. To achieve that, it is going to use Redux.
Add Redux
This example uses Redux as state management.
Now add a library called store:
❯
nx generate lib store
Create a State for Horoscope
Run command to create a redux state for horoscope:
❯
nx generate @nrwl/react:redux horoscope --project=store --directory=horoscope
In the terminal, it should output:
1CREATE libs/store/src/lib/horoscope/horoscope.slice.spec.ts
2CREATE libs/store/src/lib/horoscope/horoscope.slice.ts
3
.slice file is an extension introduced by Redux Toolkit. It is just a shorthand way to create actions + reducers + selectors in one file.
Notice in the package.json, this command also adds packages: @reduxjs/toolkit and react-redux.
Next, you are going to add a new value zodiacSignItem in the HoroscopeState to store the zodiac sign user selected. In the libs/store/src/lib/horoscope/horoscope.slice.ts file, the HoroscopeState will become:
1export interface HoroscopeState {
2  loadingStatus: 'not loaded' | 'loading' | 'loaded' | 'error';
3  error?: string;
4  **zodiacSignItem?: AdhZodiacSignItem;**
5}
6
Under horoscopeSlice, add an action to the reducers to change zodiacSignItem in the state:
1export const horoscopeSlice = createSlice({
2  name: HOROSCOPE_FEATURE_KEY,
3  initialState: initialHoroscopeState,
4  reducers: {
5    setUserZodiacSignItem(
6      state: HoroscopeState,
7      action: PayloadAction<AdhZodiacSignItem>
8    ) {
9      state.zodiacSignItem = action.payload;
10    },
11    ...
12  },
13  ...
14});
15
Create Root Store
Now you need to setup up the root reducer and configure the store. Create a root folder under libs/store/src/lib and add the below files:
1import { initialHoroscopeState } from '../horoscope/horoscope.slice';
2
3import { RootState } from './root-state.interface';
4
5export const initialRootState: RootState = {
6  horoscope: initialHoroscopeState,
7};
81import { HoroscopeState } from '../horoscope/horoscope.slice';
2
3export interface RootState {
4 horoscope: HoroscopeState;
5}
61import { combineReducers } from '@reduxjs/toolkit';
2
3import { horoscopeSlice } from '../horoscope/horoscope.slice';
4
5import { RootState } from './root-state.interface';
6
7export const rootReducer = combineReducers<RootState>({
8 horoscope: horoscopeSlice.reducer,
9});
101import { configureStore } from '@reduxjs/toolkit';
2
3import { initialRootState } from './root-state.initial';
4import { rootReducer } from './root.reducer';
5
6declare const process: any;
7
8const isDevelopment = process.env.NODE_ENV === 'development';
9
10const rootStore = configureStore({
11 reducer: rootReducer,
12 middleware: (getDefaultMiddleware) => getDefaultMiddleware(),
13 devTools: isDevelopment,
14 preloadedState: initialRootState,
15});
16
17export { rootStore };
18Dispatch Action from zodiac-sign-list Component
You now need to dispatch setUserZodiacSignItem action from libs/ui/src/lib/zodiac-sign-list/zodiac-sign-list.tsx component.
Create a file atlibs/ui/src/lib/zodiac-sign-list/zodiac-sign-list.props.ts, and add a function mapDispatchToProps. In this function, dispatch the setUserZodiacSignItem action.
1import { AdhZodiacSignItem } from '@aztro-daily-horoscope/models';
2import { horoscopeActions } from '@aztro-daily-horoscope/store';
3import { Dispatch } from '@reduxjs/toolkit';
4
5const mapDispatchToProps = (dispatch: Dispatch) => {
6  return {
7    setUserZodiacSignItem(zodiacSignItem: AdhZodiacSignItem) {
8      dispatch(horoscopeActions.setUserZodiacSignItem(zodiacSignItem));
9    },
10  };
11};
12
13type mapDispatchToPropsType = ReturnType<typeof mapDispatchToProps>;
14
15type ZodiacSignListProps = mapDispatchToPropsType;
16
17export { mapDispatchToProps, ZodiacSignListProps };
18
The component zodiac-sign-list needs to import from the above zodiac-sign-list.props file. Then the component zodiac-sign-list becomes:
1import {
2  AdhZodiacSignItem,
3  AdhZodiacSignList,
4} from '@aztro-daily-horoscope/models';
5import React from 'react';
6import { FlatList } from 'react-native';
7import { ListItem } from '@rneui/base';
8import Icon from 'react-native-vector-icons/MaterialCommunityIcons';
9import { connect } from 'react-redux';
10
11import {
12  ZodiacSignListProps,
13  mapDispatchToProps,
14} from './zodiac-sign-list.props';
15
16export function ZodiacSignList({ setUserZodiacSignItem }: ZodiacSignListProps) {
17  const keyExtractor = (item: AdhZodiacSignItem) => item.zodiacSign;
18
19  return (
20    <FlatList
21      keyExtractor={keyExtractor}
22      data={AdhZodiacSignList}
23      renderItem={({ item }) => (
24        <ListItem bottomDivider onPress={() => setUserZodiacSignItem(item)}>
25          <Icon name={item.icon} />
26          <ListItem.Content>
27            <ListItem.Title>{item.zodiacSign}</ListItem.Title>
28          </ListItem.Content>
29          <ListItem.Chevron />
30        </ListItem>
31      )}
32    />
33  );
34}
35
36export const ZodiacSignListContainer = connect(
37  null,
38  mapDispatchToProps
39)(ZodiacSignList);
40
Notice that a container component is added. This container component is stateful that connects to the redux state.
1export const ZodiacSignListContainer = connect(
2  null,
3  mapDispatchToProps
4)(ZodiacSignList);
5
This container component passes down props ZodiacSignListProps to ZodiacSignList. So this prop setUserZodiacSignItem got called at the press event for ListItem: onPress={() => setUserZodiacSignItem(item)}.
Add Provider to App
Go back to the app file at apps/daily-horoscope-app/src/app/App.tsx, now you need to replace the ZodiacSignList with ZodiacSignListContainer, and add the provider for the root store.
1import * as React from 'react';
2import { Provider } from 'react-redux';
3import { rootStore } from '@aztro-daily-horoscope/store';
4import { ZodiacSignListContainer } from '@aztro-daily-horoscope/ui';
5import { Header } from '@rneui/base';
6
7const App = () => {
8  return (
9    <Provider store={rootStore}>
10      <Header centerComponent={{ text: 'Daily Horoscope' }} />
11      <ZodiacSignListContainer />
12    </Provider>
13  );
14};
15
16export default App;
17
Awesome! So every time a zodiac sign item in the list got pressed, action gets dispatched and it should update the state with the zodiac sign selected.
Debugging Redux
First, you need to install redux-logger:
❯
# npm
❯
npm install --save-dev redux-logger @types/redux-logger
❯
#yarn
❯
yarn add redux-logger @types/redux-logger --dev
Then you need to add the redux-logger to the root store’s middleware, so the rootStore becomes:
1import logger from 'redux-logger';
2const rootStore = configureStore({
3  reducer: rootReducer,
4  middleware: (getDefaultMiddleware) =>
5    isDevelopment
6      ? getDefaultMiddleware().concat(logger)
7      : getDefaultMiddleware(),
8  devTools: isDevelopment,
9  preloadedState: initialRootState,
10});
11
Since the code is running in simulators, how to use the Redux Devtools extension and view the Redux Logger?
Open the debug menu in the simulator by entering d in the terminal that runs the start command. Then in the debug menu, choose “Debug with Chrome” for iOS and “Debug” for Android.
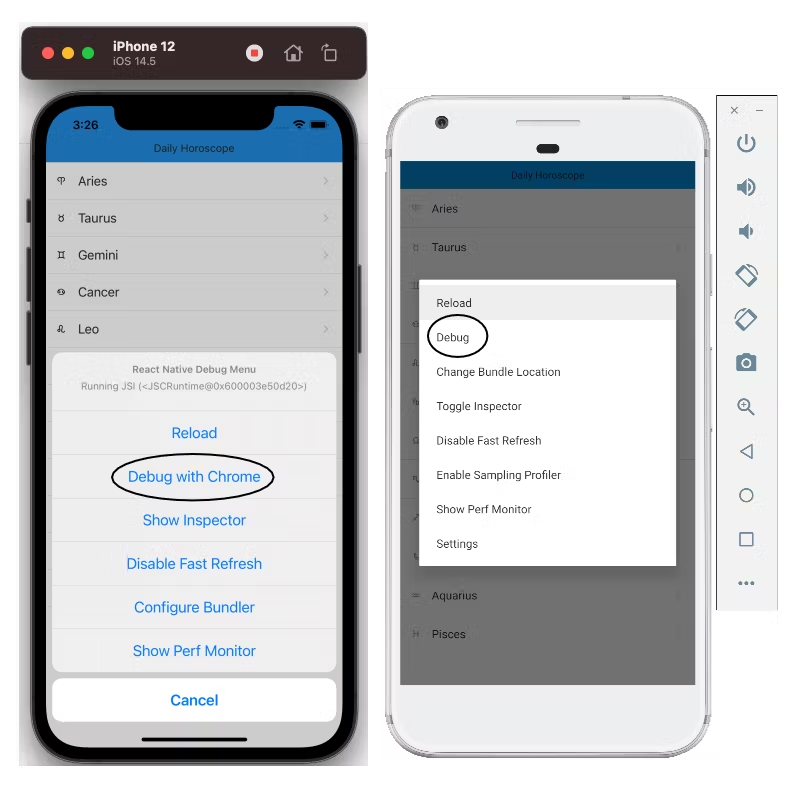 Debug Menu in iOS and Android
Install tool React Native Debugger: https://github.com/jhen0409/react-native-debugger.
Now inside React Native Debugger, you should be able to use Redux Devtools and Redux Logger. Now if you press any zodiac sign from the list, you should see action horoscope/setUserZodiacSignItem got dispatched and the state is updated.
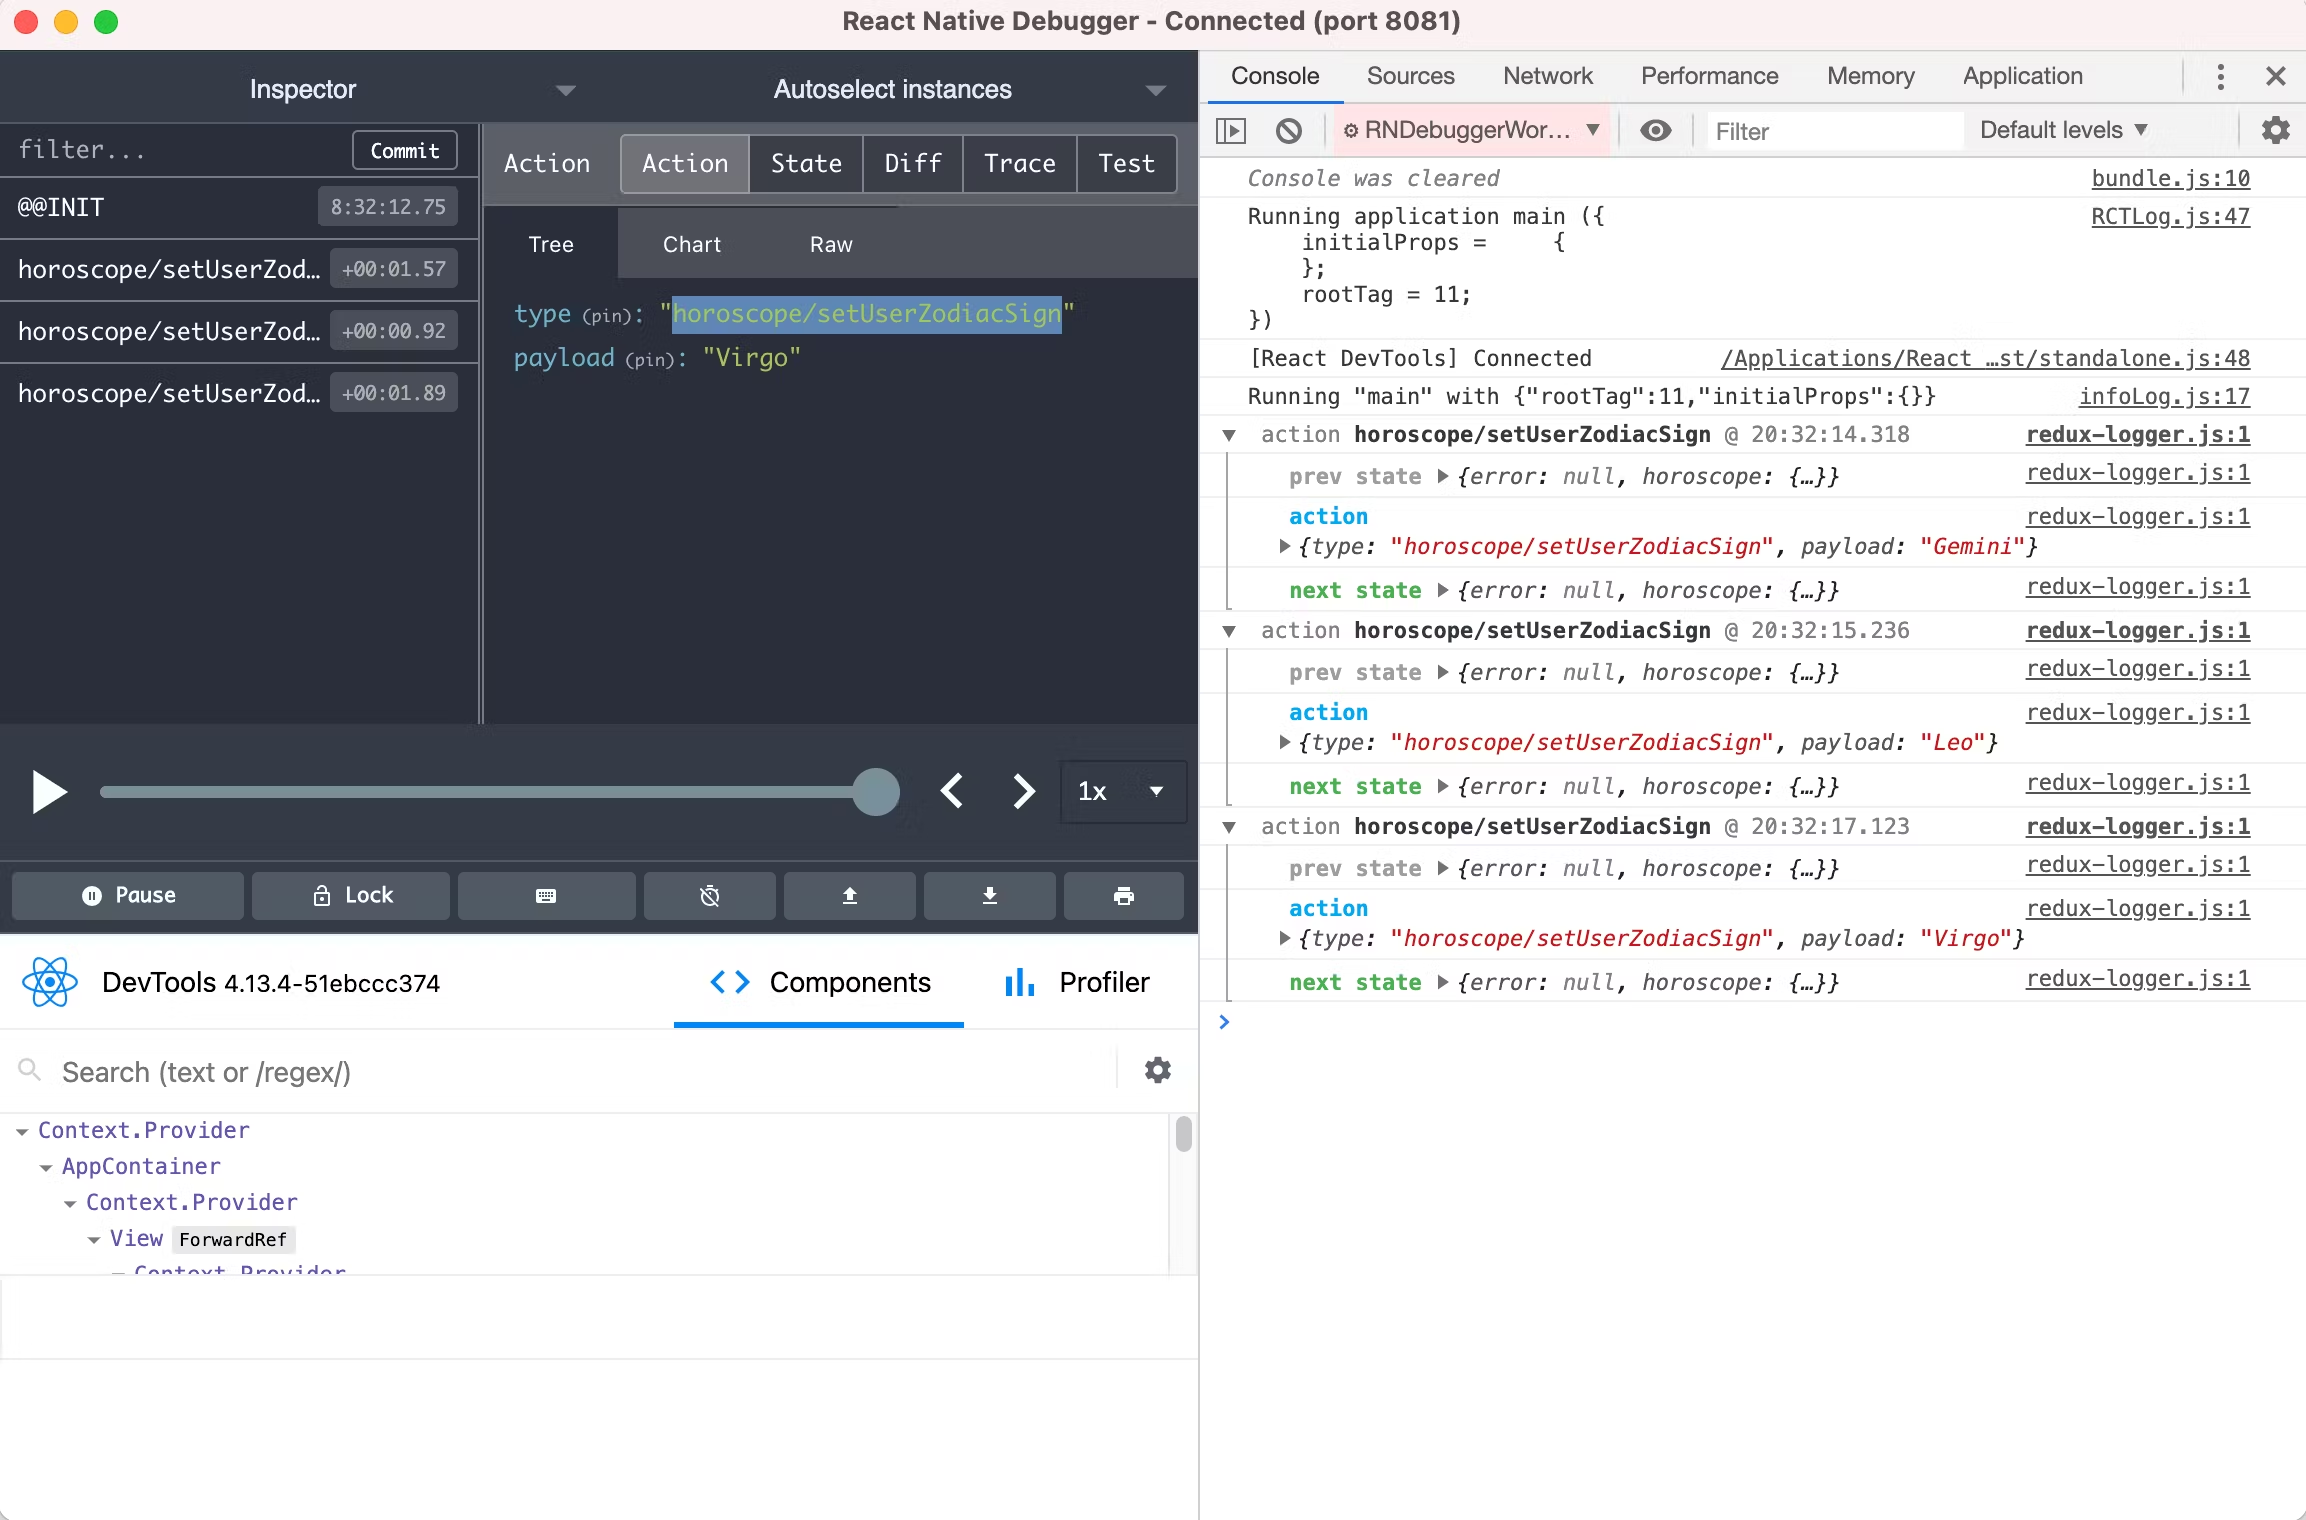 React Native Debugger
Now you have successfully set up the Redux store for your app. The next step is to navigate to a different screen when you have successfully selected a zodiac sign.
Adding Navigation
Setup
To add navigation, you need to install React Navigation library:
❯
# npm
❯
npm install --save @react-navigation/native @react-navigation/stack react-native-reanimated react-native-gesture-handler react-native-screens @react-native-community/masked-view
❯
# yarn
❯
yarn add @react-navigation/native @react-navigation/stack react-native-reanimated react-native-gesture-handler react-native-screens @react-native-community/masked-view
In the app’s package.json at apps/daily-horoscope-app/package.json, under dependencies, add the above packages:
1{
2  name: 'daily-horoscope-app',
3  version: '0.0.1',
4  private: true,
5  dependencies: {
6    // other dependencies
7    '@react-native-masked-view/masked-view': '*',
8    '@react-navigation/native': '*',
9    '@react-navigation/stack': '*',
10    'react-native-gesture-handler': '*',
11    'react-native-reanimated': '*',
12    'react-native-screens': '*',
13  },
14}
15
Go to the iOS folder at apps/daily-horoscope-app/ios/Podfile and run Pod install.
In apps/daily-horoscope-app/src/main.tsx file, add below line at top of the file:
1import 'react-native-gesture-handler';
2
Update App to Use React Navigation
Now you need to update the apps/daily-horoscope-app/src/app/App.tsx file to use React Navigation. Instead of displaying ZodiacSignListContainer component directly, now it is going to be passed to Stack.Screen. The apps/daily-horoscope-app/src/app/App.tsx file looks like below:
1import { store } from '@aztro-daily-horoscope/store';
2import { ZodiacSignListContainer } from '@aztro-daily-horoscope/ui';
3import { NavigationContainer } from '@react-navigation/native';
4import { createStackNavigator } from '@react-navigation/stack';
5import * as React from 'react';
6import { Provider } from 'react-redux';
7
8const Stack = createStackNavigator();
9
10const App = () => {
11  return (
12    <Provider store={store}>
13      <NavigationContainer>
14        <Stack.Navigator>
15          <Stack.Screen
16            name="Zodiac Sign List"
17            component={ZodiacSignListContainer}
18          />
19        </Stack.Navigator>
20      </NavigationContainer>
21    </Provider>
22  );
23};
24
25export default App;
26
If you run the code in the simulator, the app should look similar to before except for the header.
 Add React Navigation in iOS and Android simulator
Create Second Page
Now you need to create the 2nd page to be navigated. Create a component called horoscope-card under ui:
❯
nx generate component horoscope-card --project=ui --export
This should generate libs/ui/src/lib/horoscope-card folder.
Add the below code to libs/ui/src/lib/horoscope-card/horoscope-card.tsx. For now, this component is going to use mock static data. It just displays a title for the zodiac Leo. It uses the Card component from React Native Elements.
1import { AdhZodiacSign } from '@aztro-daily-horoscope/models';
2import React from 'react';
3import { Card, Text } from '@rneui/base';
4import Icon from 'react-native-vector-icons/MaterialCommunityIcons';
5
6/* eslint-disable-next-line */
7export interface HoroscopeCardProps {}
8
9export function HoroscopeCard(props: HoroscopeCardProps) {
10  return (
11    <Card>
12      <Card.Title>
13        <Icon name="zodiac-leo" size={40} />
14      </Card.Title>
15      <Card.Title>{AdhZodiacSign.Leo}</Card.Title>
16      <Card.Divider />
17      <Text h4 style={{ width: '100%', textAlign: 'center' }}>
18        Your Horoscope for Today
19      </Text>
20    </Card>
21  );
22}
23
24export default HoroscopeCard;
25
Navigate Between Screens
Now you need to add this screen to your app. In file apps/daily-horoscope-app/src/app/App.tsx, you need to update it to add a stack screen for the horoscope-card component:
1import { store } from '@aztro-daily-horoscope/store';
2import {
3  ZodiacSignListContainer,
4  HoroscopeCard,
5} from '@aztro-daily-horoscope/ui';
6import { NavigationContainer } from '@react-navigation/native';
7import { createStackNavigator } from '@react-navigation/stack';
8import * as React from 'react';
9import { Provider } from 'react-redux';
10
11const Stack = createStackNavigator();
12
13const App = () => {
14  return (
15    <Provider store={store}>
16      <NavigationContainer>
17        <Stack.Navigator>
18          <Stack.Screen
19            name="Zodiac Sign List"
20            component={ZodiacSignListContainer}
21          />
22          <Stack.Screen name="Horoscope Card" component={HoroscopeCard} />
23        </Stack.Navigator>
24      </NavigationContainer>
25    </Provider>
26  );
27};
28
29export default App;
30
In the libs/ui/src/lib/zodiac-sign-list/zodiac-sign-list.tsx, you need to trigger navigation when the list item got pressed.
Below code uses useNavigation hook from React Navigation library. When the list item got pressed, it is going to call navigation.navigate(‘Horoscope Card’) to navigate the horoscope-card component you created above.
https://gist.github.com/xiongemi/c78c719e70aa4948b98e68033d7fe4a3
1import {
2  AdhZodiacSignItem,
3  AdhZodiacSignList,
4} from '@aztro-daily-horoscope/models';
5import { useNavigation } from '@react-navigation/native';
6import React from 'react';
7import { FlatList } from 'react-native';
8import { ListItem } from 'react-native-elements';
9import Icon from 'react-native-vector-icons/MaterialCommunityIcons';
10import { connect } from 'react-redux';
11
12import {
13  ZodiacSignListProps,
14  mapDispatchToProps,
15} from './zodiac-sign-list.props';
16
17export function ZodiacSignList({ setUserZodiacSignItem }: ZodiacSignListProps) {
18  const navigation = useNavigation();
19  const keyExtractor = (item: AdhZodiacSignItem) => item.zodiacSign;
20  const zodiacListItemPress = (item: AdhZodiacSignItem) => {
21    navigation.navigate('Horoscope Card');
22    setUserZodiacSignItem(item);
23  };
24
25  return (
26    <FlatList
27      keyExtractor={keyExtractor}
28      data={AdhZodiacSignList}
29      renderItem={({ item }) => (
30        <ListItem bottomDivider onPress={() => zodiacListItemPress(item)}>
31          <Icon name={item.icon} />
32          <ListItem.Content>
33            <ListItem.Title>{item.zodiacSign}</ListItem.Title>
34          </ListItem.Content>
35          <ListItem.Chevron />
36        </ListItem>
37      )}
38    />
39  );
40}
41
42export const ZodiacSignListContainer = connect(
43  null,
44  mapDispatchToProps
45)(ZodiacSignList);
46
Now you should be able to navigate between 2 screens.
 Navigate between 2 screens
Integrate with API
Now you need to updatehoroscope-card with real data. This example uses a free and open API: https://github.com/sameerkumar18/aztro.
Add Services
First, generate a library called services:
❯
nx generate lib services
In the services folder, add the below files:
aztro-horoscope-response.interface.tsdefines what the response object looks like. It has a transform function to transform response data to the app domain model.aztro.service.tscalls the API to get the user’s horoscope based on the zodiac sign and day.
1import { AdhHoroscope, AdhZodiacSign } from '@aztro-daily-horoscope/models';
2
3export interface AztroHoroscpeResponse {
4  date_range: string;
5  current_date: string;
6  description: string;
7  compatibility: string;
8  mood: string;
9  color: string;
10  lucky_number: string;
11  lucky_time: string;
12}
13
14export function transfromAztroHoroscpeResponseToAdhHoroscope(
15  responose: AztroHoroscpeResponse
16): AdhHoroscope {
17  return {
18    currentDate: new Date(responose.current_date),
19    description: responose.description,
20    compatibility: responose.compatibility as AdhZodiacSign,
21    mood: responose.mood,
22    color: responose.color,
23    luckyNumber: parseInt(responose.lucky_number),
24    luckyTime: responose.lucky_time,
25  };
26}
271import { AdhHoroscopeDay, AdhZodiacSign } from '@aztro-daily-horoscope/models';
2
3import { AztroHoroscpeResponse } from './aztro-horoscope-response.interface';
4
5async function getHoroscope(
6 zodiacSign: AdhZodiacSign,
7 day: AdhHoroscopeDay
8): Promise<AztroHoroscpeResponse> {
9 const response = await fetch(
10 `https://aztro.sameerkumar.website/?sign=${zodiacSign}&day=${day}`
11 );
12 if (response.ok) {
13 return response.json();
14 }
15 throw response;
16}
17
18export const aztroService = { getHoroscope };
19You also need to add 2 more files to the models library:
horoscope-day.type.tsdefines the allowed day value to pass to API.horoscope.interface.tsis the app domain interface that is transformed from the API response data.
1export type AdhHoroscopeDay = 'today' | 'tomorrow' | 'yesterday';
21import { AdhZodiacSign } from './zodiac-sign.enum';
2
3export interface AdhHoroscope {
4 currentDate: Date;
5 description: string;
6 compatibility: AdhZodiacSign;
7 mood: string;
8 color: string;
9 luckyNumber: number;
10 luckyTime: string;
11}
12Connect to Redux
Now you need to create action to call aztro.service and store its response to the redux state.
Now you need to update the interface for the horoscope state value in file libs/store/src/lib/horoscope/horoscope.slice.ts:
1import {
2  AdhHoroscope,
3  AdhHoroscopeDay,
4  AdhZodiacSignItem,
5} from '@aztro-daily-horoscope/models';
6
7export interface HoroscopeState {
8  loadingStatus: 'not loaded' | 'loading' | 'loaded' | 'error';
9  error?: string;
10  zodiacSignItem?: AdhZodiacSignItem;
11  day?: AdhHoroscopeDay;
12  horoscope?: AdhHoroscope;
13}
14loadingStatusis the API request status fromaztro.service.erroris the API request error fromaztro.service.zodiacSignItemis the user’s selected zodiac sign.dayis the parameter passed toaztro.service.horoscopeis the transformed response fromaztro.service.
Then, you need to update this file to add a thunk action and reducers to fetch the horoscope:
1export const fetchHoroscope = createAsyncThunk<
2  AdhHoroscope,
3  { zodiacSign: AdhZodiacSign; day: AdhHoroscopeDay }
4>('horoscope/fetchStatus', async ({ zodiacSign, day }, { rejectWithValue }) => {
5  try {
6    const horoscopeResponse = await aztroService.getHoroscope(zodiacSign, day);
7    return transfromAztroHoroscpeResponseToAdhHoroscope(horoscopeResponse);
8  } catch (error) {
9    return rejectWithValue({ error });
10  }
11});
12
13export const horoscopeSlice = createSlice({
14  name: HOROSCOPE_FEATURE_KEY,
15  initialState: initialHoroscopeState,
16  reducers: {
17    setUserZodiacSignItem(
18      state: HoroscopeState,
19      action: PayloadAction<AdhZodiacSignItem>
20    ) {
21      state.zodiacSignItem = action.payload;
22    },
23  },
24  extraReducers: (builder) => {
25    builder
26      .addCase(fetchHoroscope.pending, (state: HoroscopeState) => {
27        state.loadingStatus = 'loading';
28      })
29      .addCase(
30        fetchHoroscope.fulfilled,
31        (state: HoroscopeState, action: PayloadAction<AdhHoroscope>) => {
32          state.horoscope = action.payload;
33          state.loadingStatus = 'loaded';
34        }
35      )
36      .addCase(fetchHoroscope.rejected, (state: HoroscopeState, action) => {
37        state.loadingStatus = 'error';
38        state.error = action.error.message;
39      });
40  },
41});
42
It adds a thunk action and its corresponding reducers:
fetchHoroscopeis going to callaztro.service.fetchHoroscope.pendingis dispatched whenfetchHoroscopeis triggeredfetchHoroscope.fulfilledis dispatched whenaztro.servicereturns a successful response. It is going to assign thestate.horoscopewith its responsefetchHoroscope.rejectedis dispatched whenaztro.servicereturns a failed response.
Now you need to pass the redux state value to your horoscope-card component. Add below selectors to this file. These are pure functions that take the root state as input and derive data from it:
1const getHoroscopeState = (rootState: RootState): HoroscopeState =>
2  rootState[HOROSCOPE_FEATURE_KEY];
3
4const getUserZodiacItem = (
5  rootState: RootState
6): AdhZodiacSignItem | undefined => getHoroscopeState(rootState).zodiacSignItem;
7
8const getUserZodiac = (rootState: RootState): AdhZodiacSign | undefined =>
9  getUserZodiacItem(rootState)?.zodiacSign;
10
11const getUserHoroscope = (rootState: RootState): AdhHoroscope | undefined =>
12  getHoroscopeState(rootState).horoscope;
13
14const getHoroscopeLoadingStatus = (rootState: RootState): LoadingStatus =>
15  getHoroscopeState(rootState).loadingStatus;
16
17export const horoscopeSelectors = {
18  getUserZodiacItem,
19  getUserZodiac,
20  getUserHoroscope,
21  getHoroscopeLoadingStatus,
22};
23
To summarize, the file libs/store/src/lib/horoscope/horoscope.slice.ts will become like below:
1import {
2  AdhHoroscope,
3  AdhHoroscopeDay,
4  AdhZodiacSign,
5  AdhZodiacSignItem,
6} from '@aztro-daily-horoscope/models';
7import {
8  aztroService,
9  transfromAztroHoroscpeResponseToAdhHoroscope,
10} from '@aztro-daily-horoscope/services';
11import { createAsyncThunk, createSlice, PayloadAction } from '@reduxjs/toolkit';
12
13import { LoadingStatus } from '../models/loading-status.type';
14import { RootState } from '../root/root-state.interface';
15
16export const HOROSCOPE_FEATURE_KEY = 'horoscope';
17export interface HoroscopeState {
18  loadingStatus: LoadingStatus;
19  error?: string;
20  zodiacSignItem?: AdhZodiacSignItem;
21  day?: AdhHoroscopeDay;
22  horoscope?: AdhHoroscope;
23}
24
25export const fetchHoroscope = createAsyncThunk<
26  AdhHoroscope,
27  { zodiacSign: AdhZodiacSign; day: AdhHoroscopeDay }
28>('horoscope/fetchStatus', async ({ zodiacSign, day }, { rejectWithValue }) => {
29  try {
30    const horoscopeResponse = await aztroService.getHoroscope(zodiacSign, day);
31    return transfromAztroHoroscpeResponseToAdhHoroscope(horoscopeResponse);
32  } catch (error) {
33    return rejectWithValue({ error });
34  }
35});
36
37export const initialHoroscopeState: HoroscopeState = {
38  loadingStatus: 'not loaded',
39};
40
41export const horoscopeSlice = createSlice({
42  name: HOROSCOPE_FEATURE_KEY,
43  initialState: initialHoroscopeState,
44  reducers: {
45    setUserZodiacSignItem(
46      state: HoroscopeState,
47      action: PayloadAction<AdhZodiacSignItem>
48    ) {
49      state.zodiacSignItem = action.payload;
50    },
51  },
52  extraReducers: (builder) => {
53    builder
54      .addCase(fetchHoroscope.pending, (state: HoroscopeState) => {
55        state.loadingStatus = 'loading';
56      })
57      .addCase(
58        fetchHoroscope.fulfilled,
59        (state: HoroscopeState, action: PayloadAction<AdhHoroscope>) => {
60          state.horoscope = action.payload;
61          state.loadingStatus = 'loaded';
62        }
63      )
64      .addCase(fetchHoroscope.rejected, (state: HoroscopeState, action) => {
65        state.loadingStatus = 'error';
66        state.error = action.error.message;
67      });
68  },
69});
70
71/*
72 * Export reducer for store configuration.
73 */
74export const horoscopeReducer = horoscopeSlice.reducer;
75export const horoscopeActions = { fetchHoroscope, ...horoscopeSlice.actions };
76
77const getHoroscopeState = (rootState: RootState): HoroscopeState =>
78  rootState[HOROSCOPE_FEATURE_KEY];
79
80const getUserZodiacItem = (
81  rootState: RootState
82): AdhZodiacSignItem | undefined => getHoroscopeState(rootState).zodiacSignItem;
83
84const getUserZodiac = (rootState: RootState): AdhZodiacSign | undefined =>
85  getUserZodiacItem(rootState)?.zodiacSign;
86
87const getUserHoroscope = (rootState: RootState): AdhHoroscope | undefined =>
88  getHoroscopeState(rootState).horoscope;
89
90const getHoroscopeLoadingStatus = (rootState: RootState): LoadingStatus =>
91  getHoroscopeState(rootState).loadingStatus;
92
93export const horoscopeSelectors = {
94  getUserZodiacItem,
95  getUserZodiac,
96  getUserHoroscope,
97  getHoroscopeLoadingStatus,
98};
99
Then update horoscope-card component with the below code. Notice inside mapStateToProps function, it uses selector functions from above.
1import { AdhHoroscopeDay, AdhZodiacSign } from '@aztro-daily-horoscope/models';
2import {
3  horoscopeActions,
4  horoscopeSelectors,
5  RootState,
6} from '@aztro-daily-horoscope/store';
7import { AnyAction, ThunkDispatch } from '@reduxjs/toolkit';
8
9const mapStateToProps = (state: RootState) => {
10  return {
11    zodiacItem: horoscopeSelectors.getUserZodiacItem(state),
12    horoscope: horoscopeSelectors.getUserHoroscope(state),
13    loadingStatus: horoscopeSelectors.getHoroscopeLoadingStatus(state),
14  };
15};
16
17const mapDispatchToProps = (
18  dispatch: ThunkDispatch<RootState, void, AnyAction>
19) => {
20  return {
21    getUserHoroscope(zodiacSign: AdhZodiacSign, day: AdhHoroscopeDay) {
22      dispatch(horoscopeActions.fetchHoroscope({ zodiacSign, day }));
23    },
24  };
25};
26
27type mapStateToPropsType = ReturnType<typeof mapStateToProps>;
28type mapDispatchToPropsType = ReturnType<typeof mapDispatchToProps>;
29
30type HoroscopeCardProps = mapStateToPropsType & mapDispatchToPropsType;
31
32export { mapStateToProps, mapDispatchToProps, HoroscopeCardProps };
331import { LoadingStatus } from '@aztro-daily-horoscope/store';
2import React, { useEffect } from 'react';
3import { ActivityIndicator, SafeAreaView, ScrollView } from 'react-native';
4import { Card, Text } from 'react-native-elements';
5import Icon from 'react-native-vector-icons/MaterialCommunityIcons';
6import { connect } from 'react-redux';
7
8import {
9 mapStateToProps,
10 mapDispatchToProps,
11 HoroscopeCardProps,
12} from './horoscope-card.props';
13
14export function HoroscopeCard({
15 zodiacItem,
16 horoscope,
17 loadingStatus,
18 getUserHoroscope,
19}: HoroscopeCardProps) {
20 useEffect(() => {
21 if (zodiacItem?.zodiacSign) {
22 getUserHoroscope(zodiacItem.zodiacSign, 'today');
23 }
24 }, [zodiacItem, getUserHoroscope]);
25
26 return (
27 <SafeAreaView>
28 <ScrollView>
29 <Card>
30 <Card.Title>
31 <Icon name={zodiacItem?.icon} size={40} />
32 </Card.Title>
33 <Card.Title>{zodiacItem?.zodiacSign}</Card.Title>
34 <Card.Divider />
35 <Text h4 style={{ width: '100%', textAlign: 'center' }}>
36 Your Horoscope for Today
37 </Text>
38 {loadingStatus === LoadingStatus.Success ? (
39 <>
40 <Text style={{ marginTop: 10 }}>{horoscope.description}</Text>
41 <Text style={{ marginTop: 10 }}>Mood: {horoscope.mood}</Text>
42 <Text style={{ marginTop: 10 }}>Color: {horoscope.color}</Text>
43 <Text style={{ marginTop: 10 }}>
44 Compatibility: {horoscope.compatibility}
45 </Text>
46 <Text style={{ marginTop: 10 }}>
47 Lucky Number: {horoscope.luckyNumber}
48 </Text>
49 <Text style={{ marginTop: 10 }}>
50 Lucky Time: {horoscope.luckyTime}
51 </Text>
52 </>
53 ) : loadingStatus === LoadingStatus.Error ? (
54 <Text h2>Oops! Something went wrong. Please try agian.</Text>
55 ) : (
56 <ActivityIndicator />
57 )}
58 </Card>
59 </ScrollView>
60 </SafeAreaView>
61 );
62}
63
64export const HoroscopeCardContainer = connect(
65 mapStateToProps,
66 mapDispatchToProps
67)(HoroscopeCard);
68Notice inside the horoscope-card component, it has a hook to dispatch action getUserHoroscope when this component got mounted.
1useEffect(() => {
2  if (zodiacItem?.zodiacSign) {
3    getUserHoroscope(zodiacItem.zodiacSign, 'today');
4  }
5}, [zodiacItem, getUserHoroscope]);
6
In the App component, replace HoroscopeCard with HoroscopeCardContainer:
1 <Stack.Screen
2 name="Horoscope Card"
3 component={**HoroscopeCardContainer**}
4 />
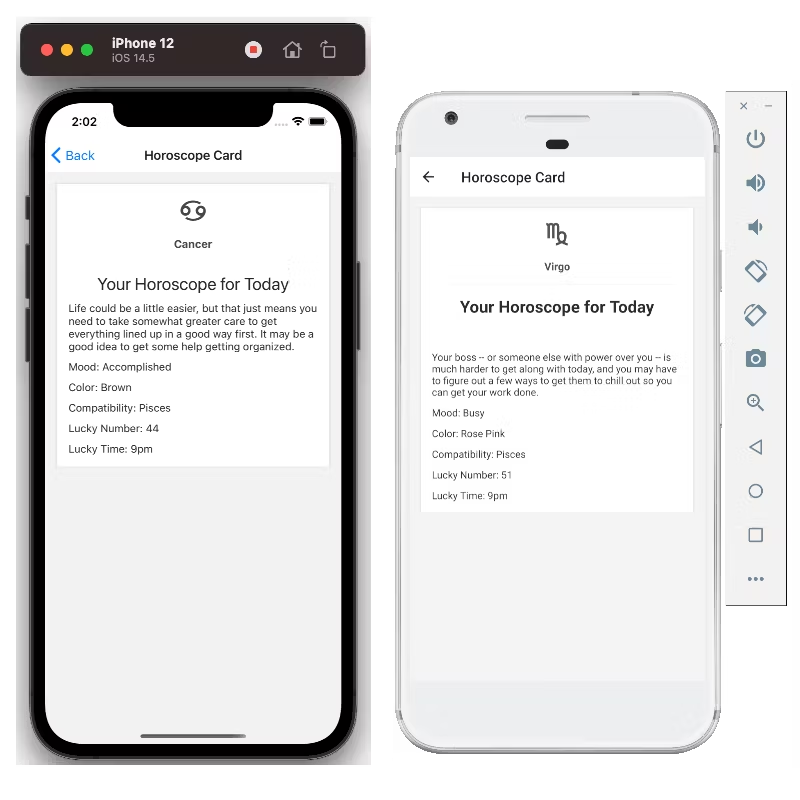
5Now when you run the app, it should display the horoscope according to the zodiac user selected.
Horoscope Card integrated with API
Finally, you got a mobile app that runs on both Android and iOS. You could reuse the libraries to create a web app.
If you run command nx dep-graph, you should see the dependency graph looks like below:
 Dependency Graph
Create Web App
First, generate a React app called daily-horoscope-app:
❯
nx generate @nrwl/react:app daily-horoscope-app
You could reuse store, models, and services libraries and write a separate ui for the React web app. However, this example just reuses ui library and displays React Native components directly. To do so, it needs to install package react-native-web:
❯
# npm
❯
npm install --save react-native-web
❯
npm install --save-dev babel-plugin-react-native-web
❯
# yarn
❯
yarn add react-native-web
❯
yarn add --dev babel-plugin-react-native-web
For apps/daily-horoscope-web/src/main.tsx, change it to:
1import { AppRegistry } from 'react-native';
2import App from './app/app';
3AppRegistry.registerComponent('main', () => App);
4AppRegistry.runApplication('main', {
5  rootTag: document.getElementById('root'),
6});
7
Copy your code from daily-horoscope-app’s app file to daily-horoscope-web’s app file and add styles for the icon font files:
1import { rootStore } from '@aztro-daily-horoscope/store';
2import {
3  ZodiacSignListContainer,
4  HoroscopeCardContainer,
5} from '@aztro-daily-horoscope/ui';
6import { NavigationContainer } from '@react-navigation/native';
7import { createStackNavigator } from '@react-navigation/stack';
8import * as React from 'react';
9import { Provider } from 'react-redux';
10
11const Stack = createStackNavigator();
12
13const App = () => {
14  return (
15    <>
16      <style type="text/css">{`
17        @font-face {
18          font-family: 'MaterialIcons';
19          src: url(${require('react-native-vector-icons/Fonts/MaterialIcons.ttf')}) format('truetype');
20        }
21        @font-face {
22          font-family: 'MaterialCommunityIcons';
23          src: url(${require('react-native-vector-icons/Fonts/MaterialCommunityIcons.ttf')}) format('truetype');
24        }
25      `}</style>
26      <Provider store={rootStore}>
27        <NavigationContainer>
28          <Stack.Navigator>
29            <Stack.Screen
30              name="Zodiac Sign List"
31              component={ZodiacSignListContainer}
32            />
33            <Stack.Screen
34              name="Horoscope Card"
35              component={HoroscopeCardContainer}
36            />
37          </Stack.Navigator>
38        </NavigationContainer>
39      </Provider>
40    </>
41  );
42};
43
44export default App;
451const getWebpackConfig = require('@nrwl/react/plugins/webpack');
2
3function getCustomWebpackConfig(webpackConfig) {
4 const config = getWebpackConfig(webpackConfig);
5 const isProduction = webpackConfig.mode === 'production';
6
7 if (!isProduction) {
8 config.resolve.alias = {
9 'react-native': 'react-native-web',
10 };
11
12 config.module.rules.push(
13 {
14 test: /\.ttf$/,
15 loader: require.resolve('file-loader'),
16 options: { esModule: false, name: 'static/media/[path][name].[ext]' },
17 },
18 {
19 test: /\.(js|jsx)$/,
20 exclude: function (content) {
21 return (
22 /node_modules/.test(content) &&
23 !/\/react-native-elements\//.test(content) &&
24 !/\/react-native-vector-icons\//.test(content) &&
25 !/\/react-native-ratings\//.test(content)
26 );
27 },
28 use: {
29 loader: require.resolve('@nrwl/web/src/utils/web-babel-loader.js'),
30 options: {
31 presets: [
32 [
33 '@nrwl/react/babel',
34 {
35 runtime: 'automatic',
36 useBuiltIns: 'usage',
37 },
38 ],
39 ],
40 plugins: ['react-native-web'],
41 },
42 },
43 }
44 );
45 }
46
47 return config;
48}
49
50module.exports = getCustomWebpackConfig;
51Then you need a customized Webpack file. It adds 2 additional rules to read the icon font files and React Native Elements library files.
Also in workspace.json, change the webpackConfig under daily-horoscope-web to point this custom webpack file like:
1"webpackConfig": "apps/daily-horoscope-web/webpack.js"
2
Now if you run nx serve daily-horoscope-web, it should the web app in the browser.
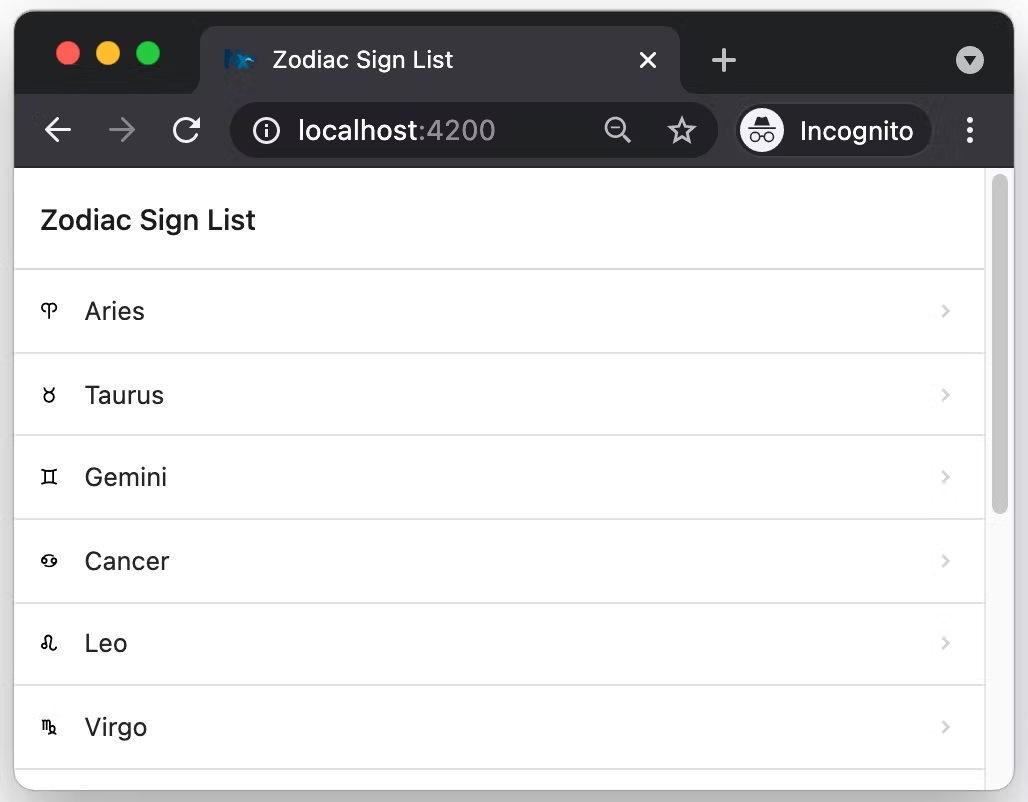 Web App
Now the dependency graph should look like:
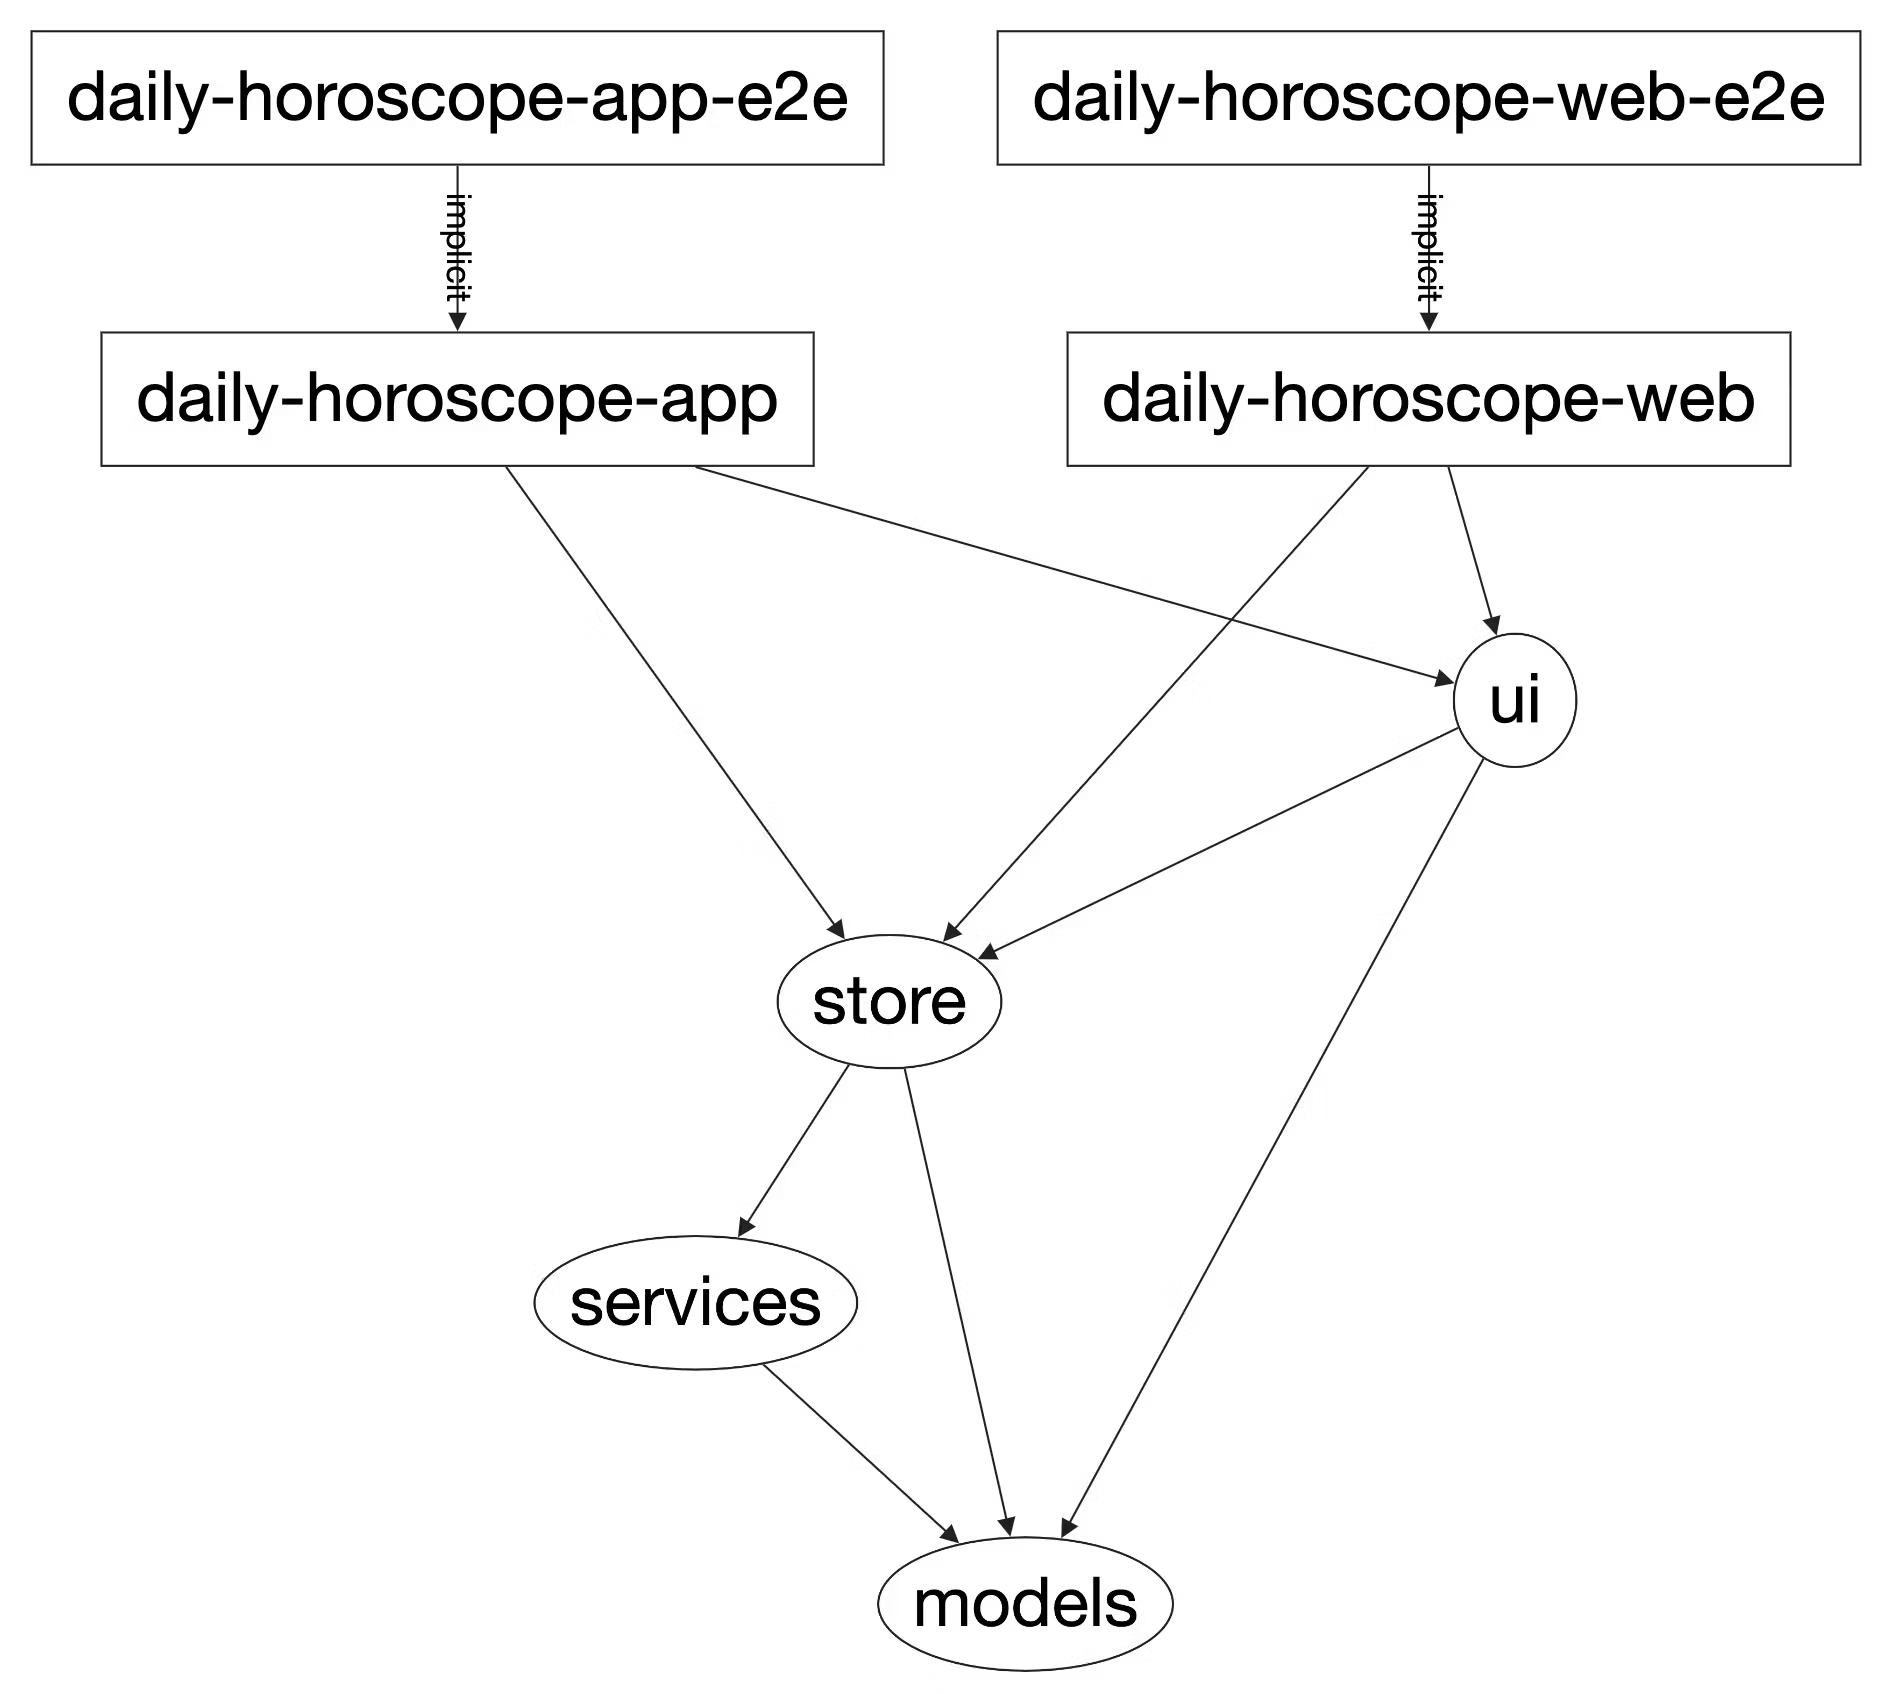 Dependency Graph
Conclusion
Congratulations! You have created a React Native mobile app and a React web app. Nx + React + React Native is a powerful tool that allows you to have both mobile and web app code in the same repo with shared business logic.