
In my previous blogs (see links at the end), I wrote about how to develop Nx React Native applications. However, as developers, we are constantly searching for ways to make the developer experience better.
This blog will show how to add Storybook to Nx React Native applications. With Nx, you don’t need to go through this long guideline to set up the Storybook, you can quickly get it running.
Example Repo: xiongemi/studio-ghibli-search-engine
Storybook:
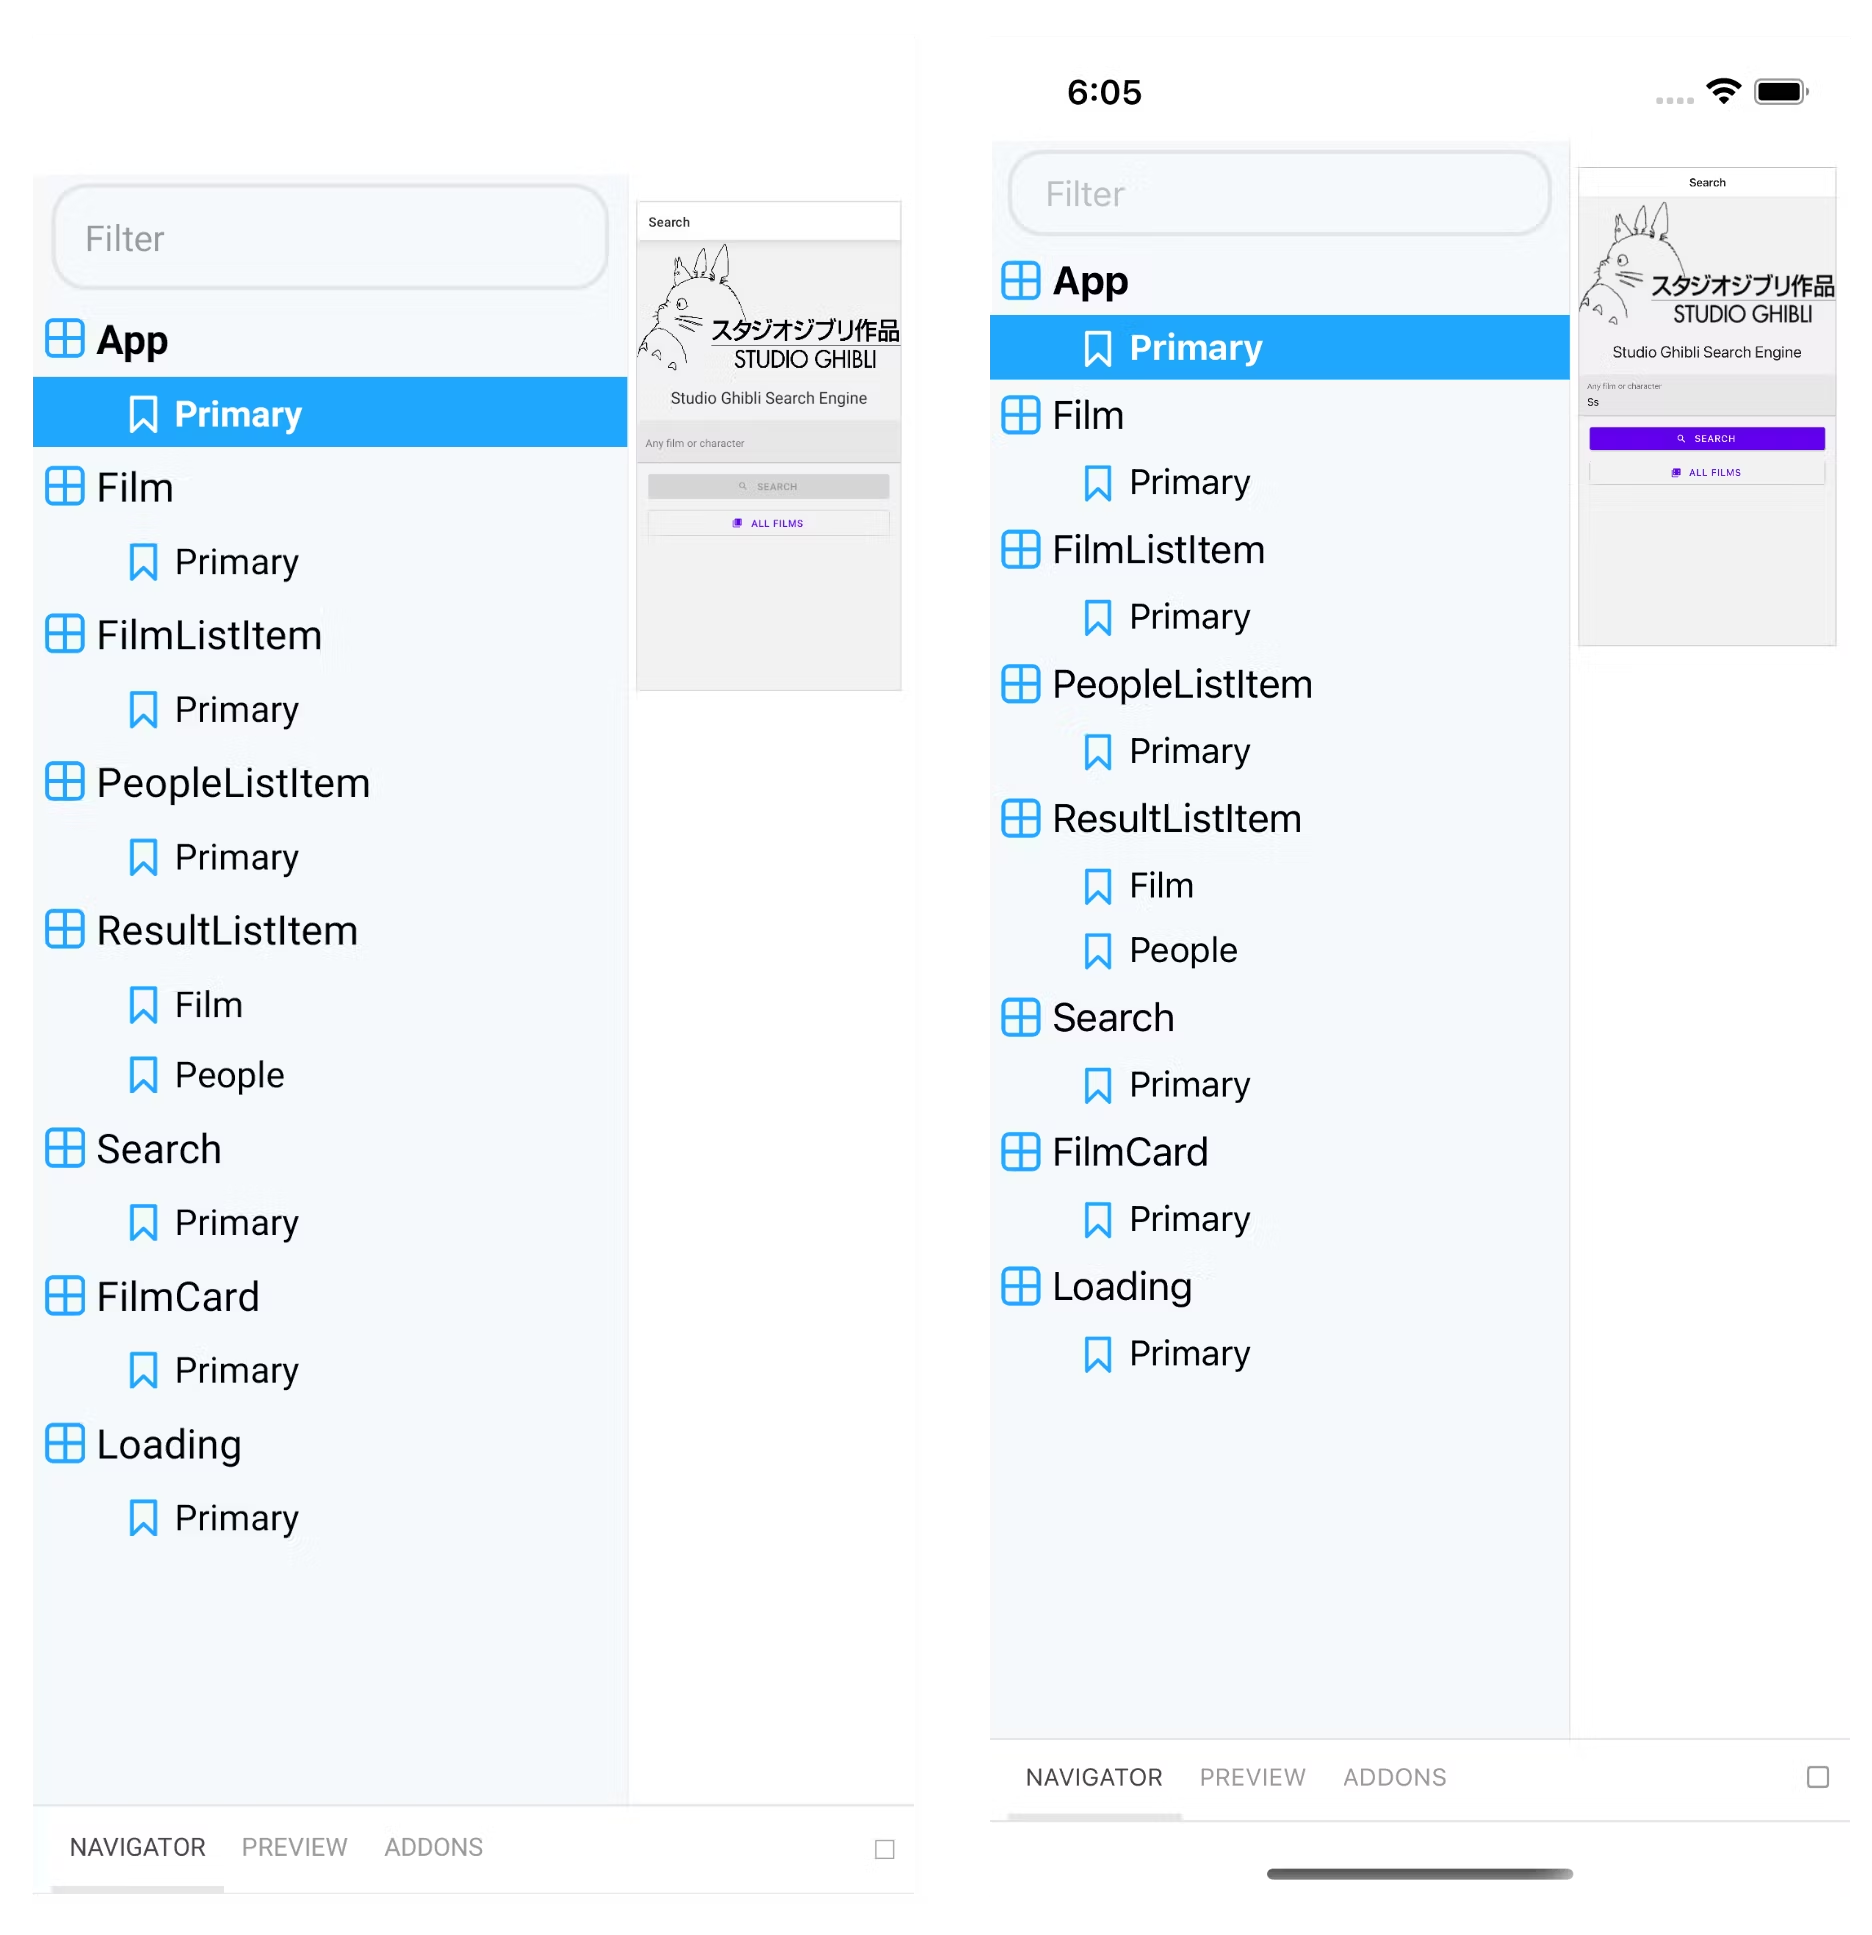 Storybook View (left: Android, right: iOS)
Setup
First, you need to add @nrwl/storybook to your existing Nx React Native workspace:
❯
# npm
❯
npm install @nrwl/storybook --save-dev
❯
# yarn
❯
yarn add --dev @nrwl/storybook
Then you need to generate the storybook configuration for your app or lib:
❯
nx g @nrwl/react-native:storybook-configuration **<your app or lib>**
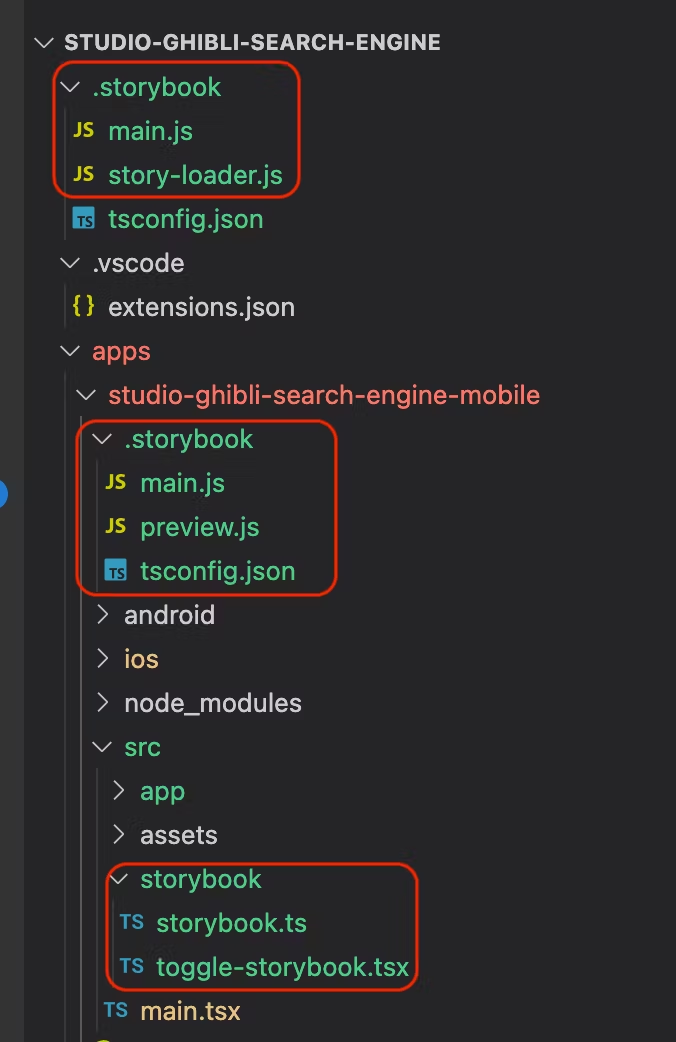
As shown in the example below, 3 folders got generated:
.storybookat workspace root.storybookin your app or libstorybookin your app (Note: this folder is for creating the Storybook UI component. It will only be created for the app, you will not see this for lib.)
If you choose to automatically generate *.stories file, you should see the default story looks like below:
1import { storiesOf } from '@storybook/react-native';
2import React from 'react';
3
4import { Loading } from './loading';
5
6const props = {};
7
8storiesOf('Loading', module).add('Primary', () => <Loading {...props} />);
9
To gather the stories you created, run the command:
❯
nx storybook **<your app or lib>**
You should see in the terminal saying:
❯
Writing to <your workspace>/.storybook/story-loader.js
In your <your workspace>/.storybook/story-loader.js, it should list your stories created under your app or lib similar to the below example:
1// Auto-generated file created by react-native-storybook-loader
2// Do not edit.
3//
4// https://github.com/elderfo/react-native-storybook-loader.git
5
6function loadStories() {
7  require('../apps/studio-ghibli-search-engine-mobile/src/app/App.stories');
8  require('../apps/studio-ghibli-search-engine-mobile/src/app/film/film.stories');
9  require('../apps/studio-ghibli-search-engine-mobile/src/app/results/film-list-item/film-list-item.stories');
10  require('../apps/studio-ghibli-search-engine-mobile/src/app/results/people-list-item/people-list-item.stories');
11  require('../apps/studio-ghibli-search-engine-mobile/src/app/results/result-list-item/result-list-item.stories');
12  require('../apps/studio-ghibli-search-engine-mobile/src/app/search/search.stories');
13  require('../apps/studio-ghibli-search-engine-mobile/src/app/shared/film-card/film-card.stories');
14  require('../apps/studio-ghibli-search-engine-mobile/src/app/shared/loading/loading.stories');
15}
16
17const stories = [
18  '../apps/studio-ghibli-search-engine-mobile/src/app/App.stories',
19  '../apps/studio-ghibli-search-engine-mobile/src/app/film/film.stories',
20  '../apps/studio-ghibli-search-engine-mobile/src/app/results/film-list-item/film-list-item.stories',
21  '../apps/studio-ghibli-search-engine-mobile/src/app/results/people-list-item/people-list-item.stories',
22  '../apps/studio-ghibli-search-engine-mobile/src/app/results/result-list-item/result-list-item.stories',
23  '../apps/studio-ghibli-search-engine-mobile/src/app/search/search.stories',
24  '../apps/studio-ghibli-search-engine-mobile/src/app/shared/film-card/film-card.stories',
25  '../apps/studio-ghibli-search-engine-mobile/src/app/shared/loading/loading.stories',
26];
27
28module.exports = {
29  loadStories,
30  stories,
31};
32
Also, notice that in your app’s main file, the import of the App changed to storybook/toggle-storybook:
1import App from './storybook/toggle-storybook';
2
View Storybook for App
To view the storybook on the simulator/emulator/device, start the app like you usually do:
❯
# iOS
❯
nx run-ios <your app>
❯
# Android
❯
nx run-android <your app>
In your simulator/emulator/device, open the Debug Menu by entering d in terminal. You should see the menu option Toggle Storybook in the Debug Menu:
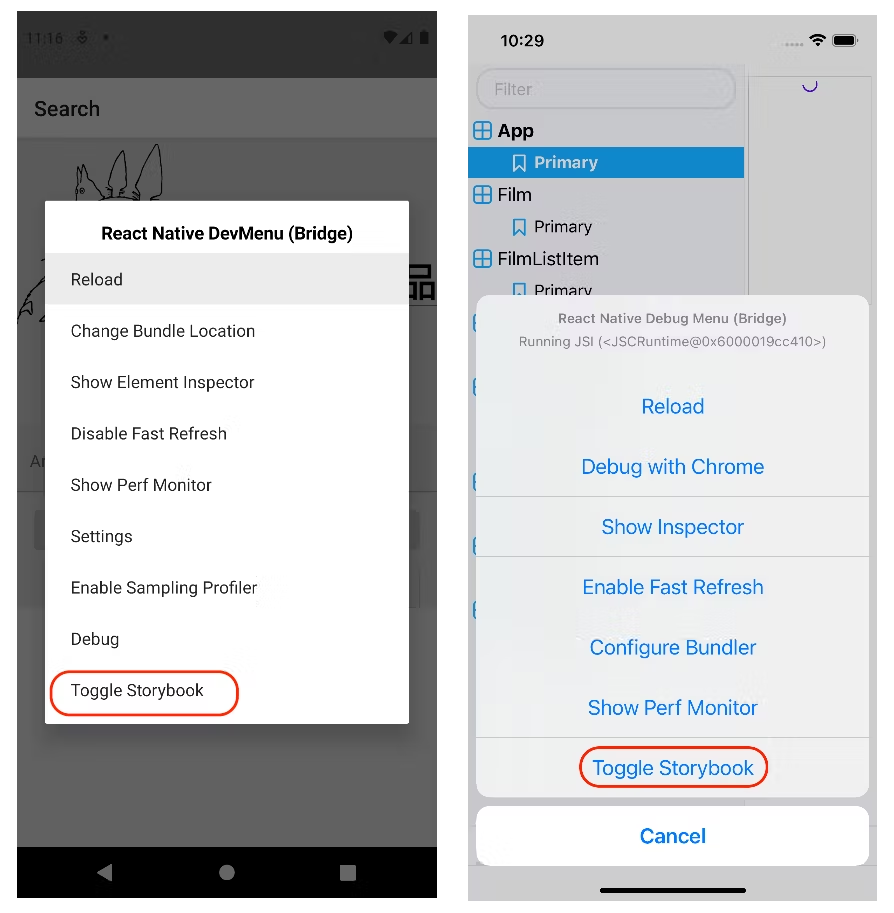 Screenshot of Debug menu (left: Android, right: iOS)
When switching on the toggle, you should see the list of your component stories:
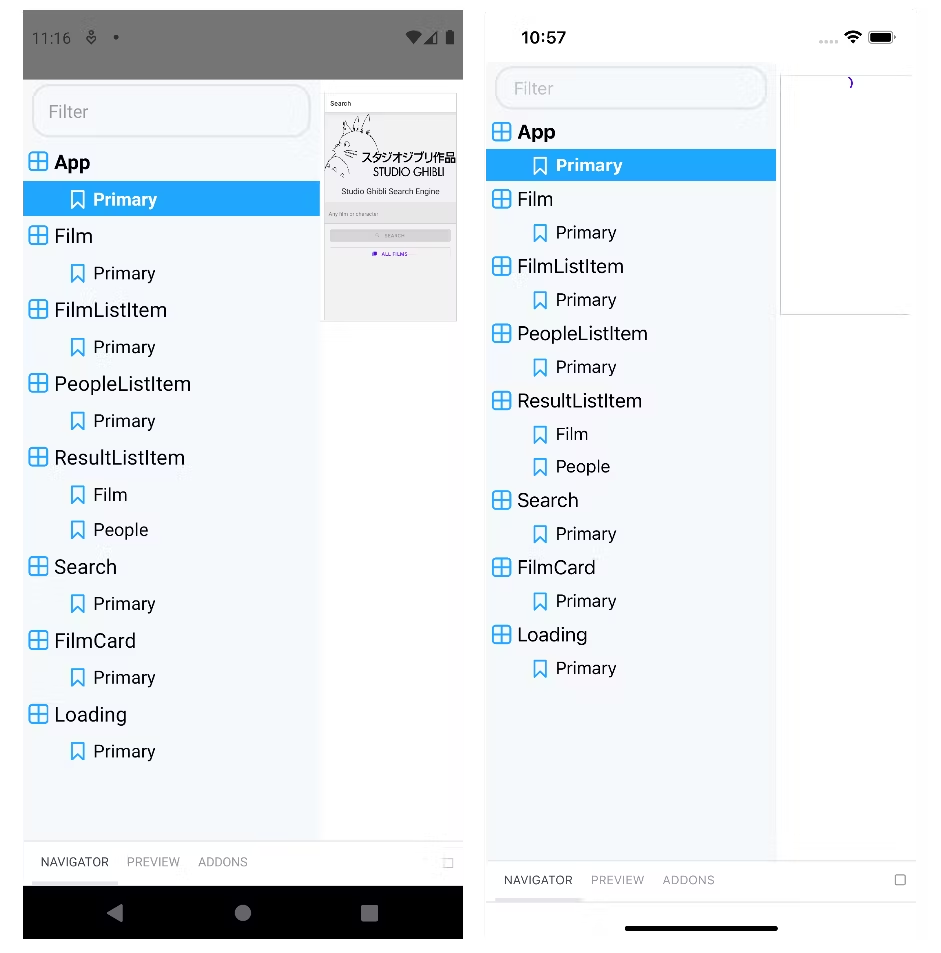 Storybook View (left: Android, right: iOS)
View Storybook for Lib
Note: the storybook can only be viewed inside an app. To view the storybook for lib in the workspace, you need to first set up the storybook for an app in the workspace.
Then run the command:
❯
nx storybook **<your lib>**
This should update the .storybook/story-loader.js with stories in your lib.
Then just run the command to start your app, you should see the storybook for your lib.
Troubleshooting
Error: Couldn’t find a navigation object
If you are using the library @react-navigation/native and you are using hooks like useNavigtion and useRoute inside your component, you are likely to get the below error:
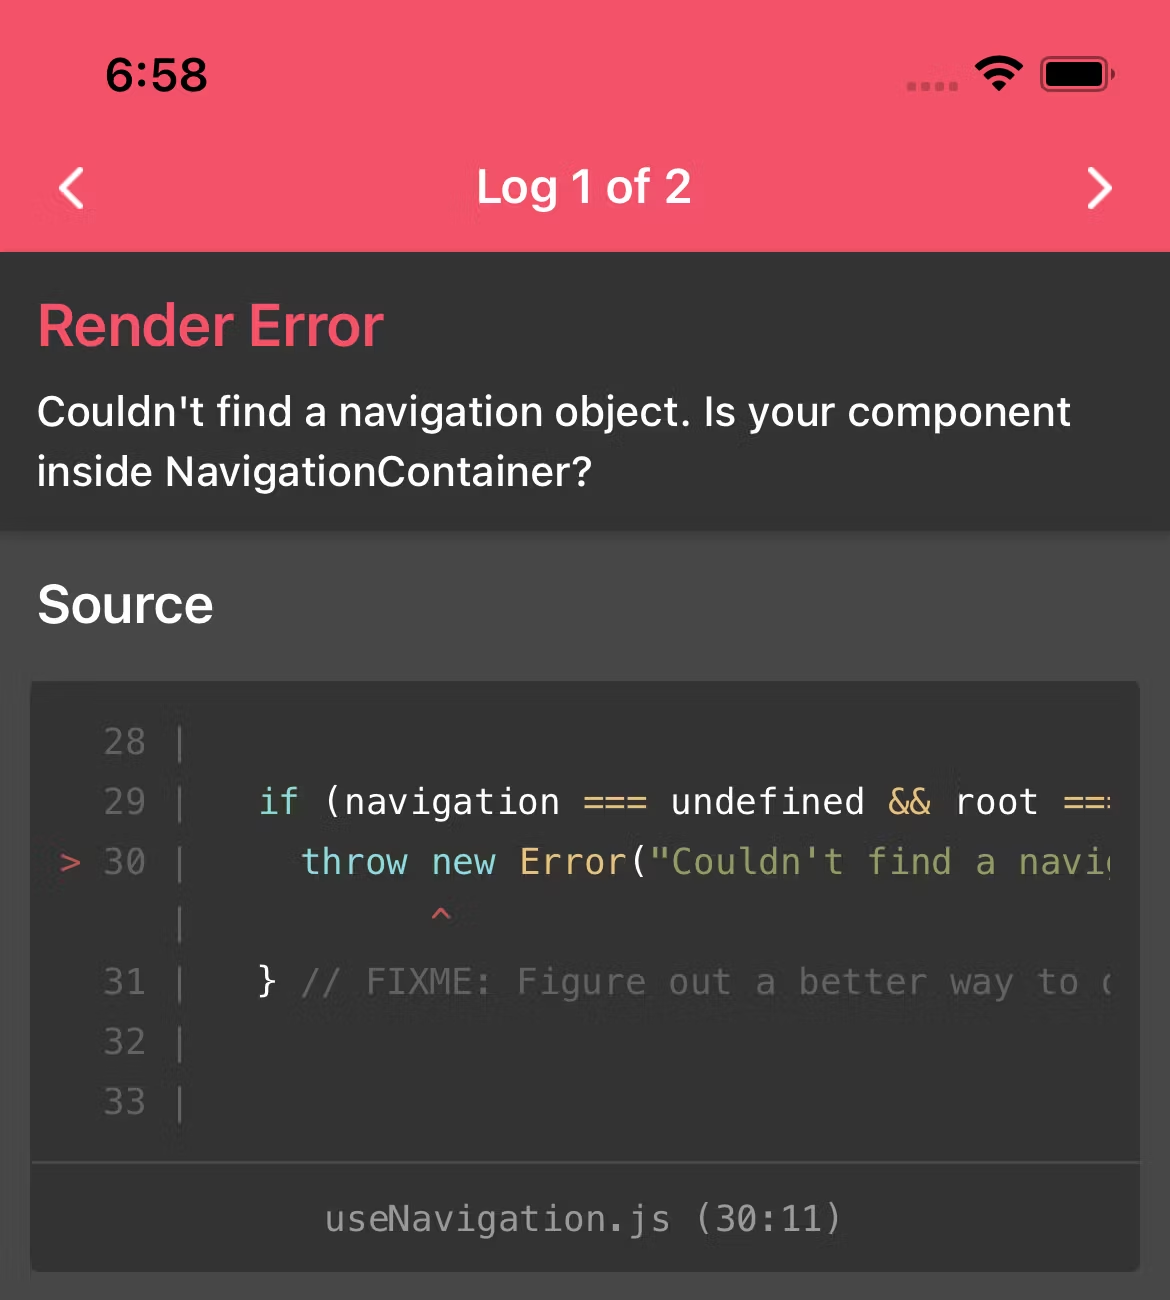 Render Error for Couldn’t find a navigation object
The easiest way is just to mock this library and create a decorator for it:
1import { NavigationContainer } from '@react-navigation/native';
2import React from 'react';
3
4export const NavigationDecorator = (story) => {
5  return (
6    <NavigationContainer independent={true}>{story()}</NavigationContainer>
7  );
8};
9
Mock Navigation Decorator
Then in your story, you just need to add the above NavigationDecorator:
1import { storiesOf } from '@storybook/react-native';
2import { mockFilmEntity } from '@studio-ghibli-search-engine/models';
3import React from 'react';
4
5import { NavigationDecorator } from '../../../storybook/mocks/navigation';
6
7import FilmListItem from './film-list-item';
8
9storiesOf('FilmListItem', module)
10  .addDecorator(NavigationDecorator)
11  .add('Primary', () => <FilmListItem film={mockFilmEntity} />);
12
Add NavigationDecoration to the story
Now, this error should go away and you should see your component in your storybook.
If your component is using the useRoute hook and expecting certain routing parameters, then you need to customize the mock NavigationDecorator for your component. For example, below is a component that is expecting an id from the route parameters:
1const route = useRoute<RouteProp<{ params: { id: string } }>>();
2const id = route.params?.id;
3
The mock NavigationDecorator will become:
1import { NavigationContainer } from '@react-navigation/native';
2import { createNativeStackNavigator } from '@react-navigation/native-stack';
3import React from 'react';
4
5const NavigationDecorator = (story) => {
6  const Stack = createNativeStackNavigator();
7  return (
8    <NavigationContainer independent={true}>
9      <Stack.Navigator>
10        <Stack.Screen
11          name="MyStorybookScreen"
12          component={story}
13          initialParams={{ id: 123 }}
14        />
15      </Stack.Navigator>
16    </NavigationContainer>
17  );
18};
19
Error: Could not find “store”
If you are using Redux store and your component is stateful and connected to the store, you are likely to get the below error:
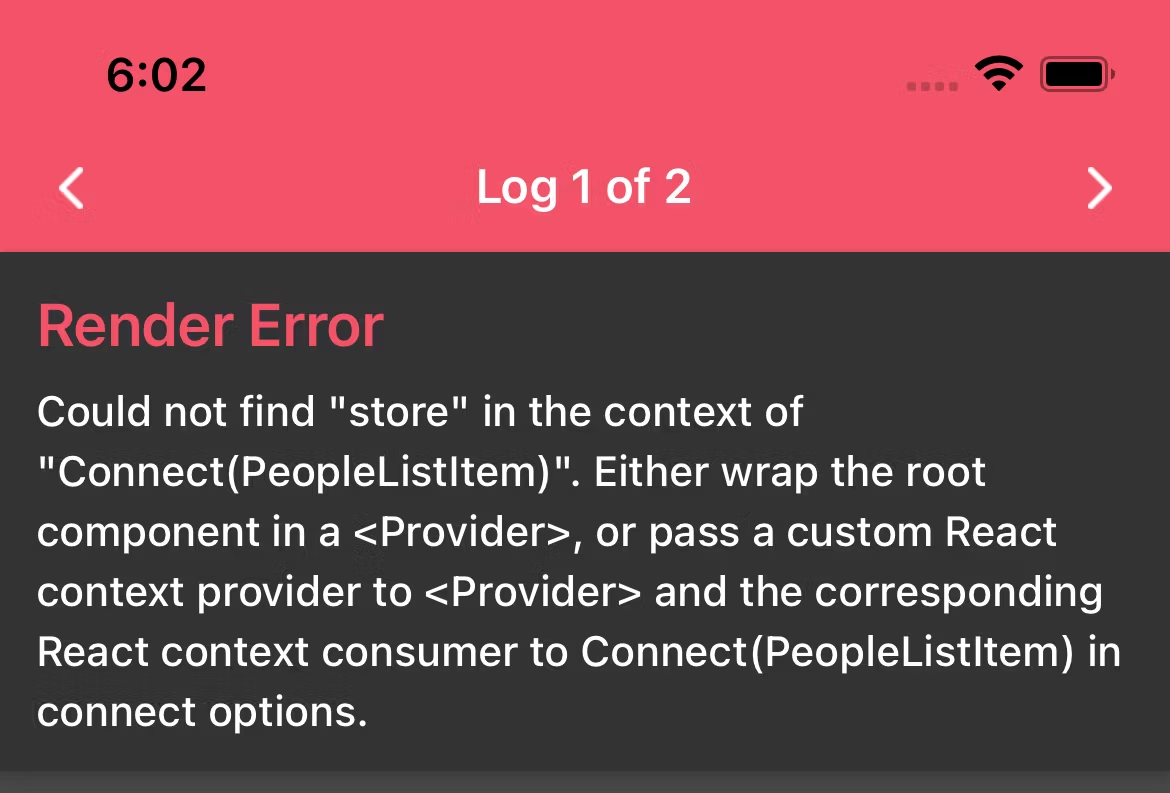 Render Error for Could not find “store”
The simple solution is to mock the store. First, you need to install the library redux-mock-store and its typing:
❯
# npm
❯
npm install redux-mock-store @types/redux-mock-store --save-dev# yarn
❯
yarn add redux-mock-store @types/redux-mock-store --dev
Similarly, like how you mock up the navigation, you need to mock up the store. The below example mocks the store with the initial root state:
1import {
2  initialRootState,
3  RootState,
4} from '@studio-ghibli-search-engine/store';
5import React from 'react';
6import { Provider as StoreProvider } from 'react-redux';
7import configureStore from 'redux-mock-store';
8
9export const StoreDecorator = (story) => {
10  const mockStore = configureStore<RootState>([]);
11  const store = mockStore(initialRootState);
12  return <StoreProvider store={store}>{story()}</StoreProvider>;
13};
14
You can add this store decorator to your story:
1import { storiesOf } from '@storybook/react-native';
2import { mockPeopleEntity } from '@studio-ghibli-search-engine/models';
3import React from 'react';
4
5import { NavigationDecorator, StoreDecorator } from '../../../storybook/mocks';
6
7import PeopleListItem from './people-list-item';
8
9storiesOf('PeopleListItem', module)
10  .addDecorator(StoreDecorator)
11  .addDecorator(NavigationDecorator)
12  .add('Primary', () => <PeopleListItem people={mockPeopleEntity} />);
13
Error: Actions must be plain objects
If you use an async action (for example, an action created using createAsyncThunk from @reduxjs/toolkit), you would likely run into the below error: Actions must be plain objects.
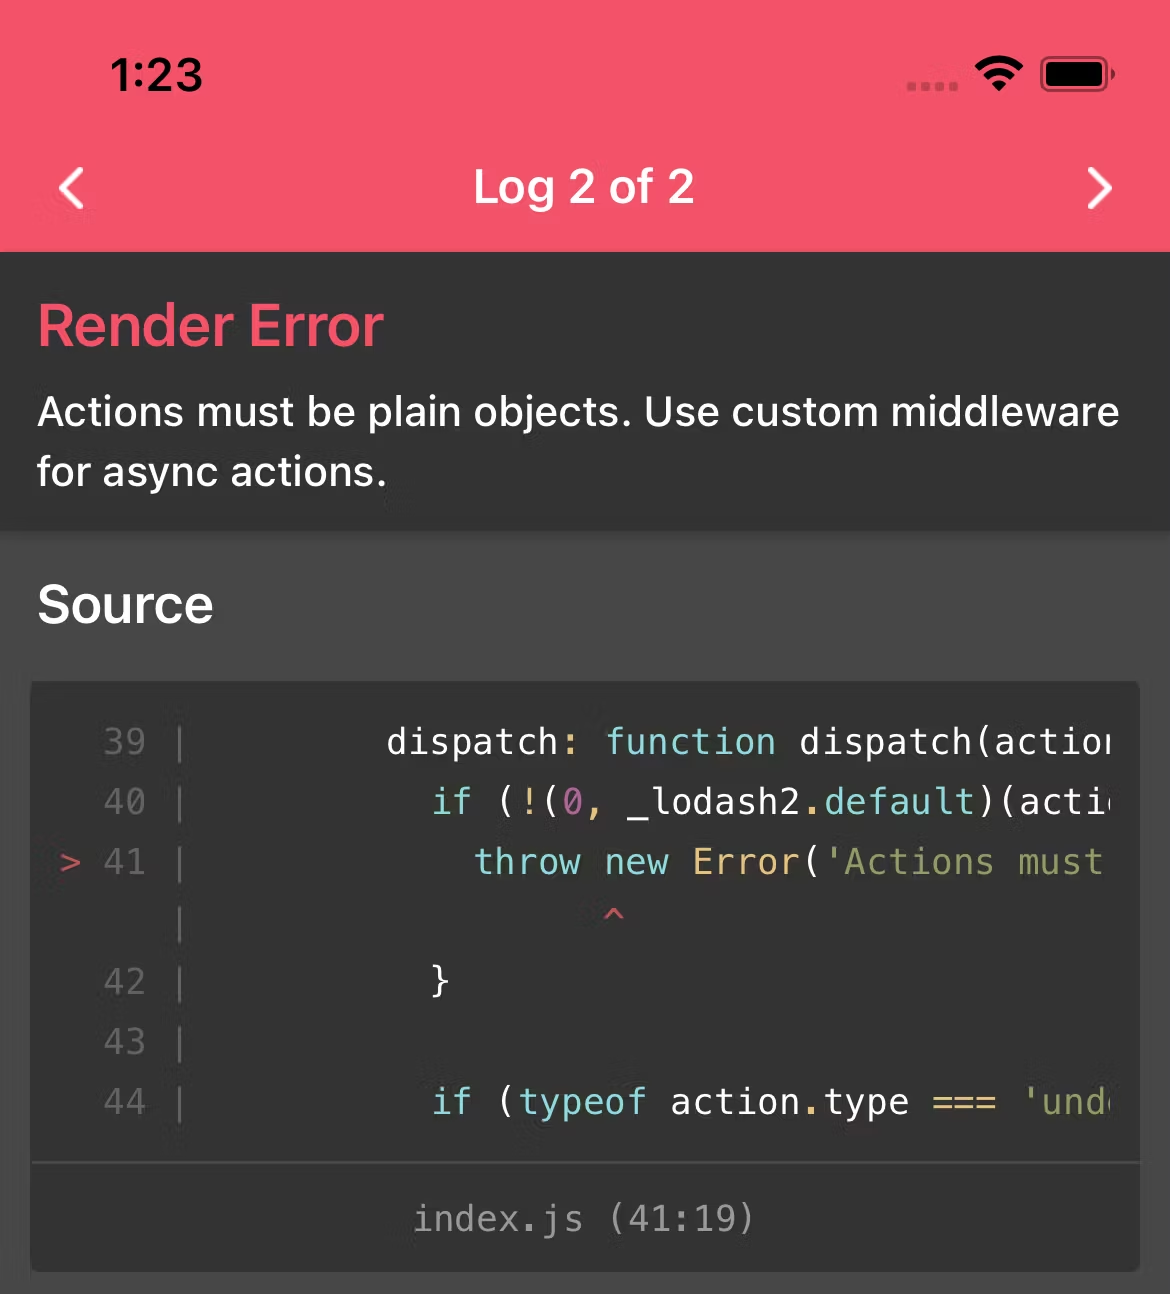 Render Error for Actions must be plain objects
Now to resolve this, add thunk to mock store middleware:
1import {
2  initialRootState,
3  RootState,
4} from '@studio-ghibli-search-engine/store';
5import React from 'react';
6import { Provider as StoreProvider } from 'react-redux';
7import configureStore from 'redux-mock-store';
8import thunk from 'redux-thunk';
9
10export const StoreDecorator = (story) => {
11  const mockStore = configureStore<RootState>([thunk]);
12  const store = mockStore({ ...initialRootState });
13  return <StoreProvider store={store}>{story()}</StoreProvider>;
14};
15
Conclusion
Here are how to use Storybook with Nx React Native and some common errors you may run into. With Nx React Native, you can quickly view Storybook with a toggle option in Debug Menu. It allows developers to interact and test with components during development.